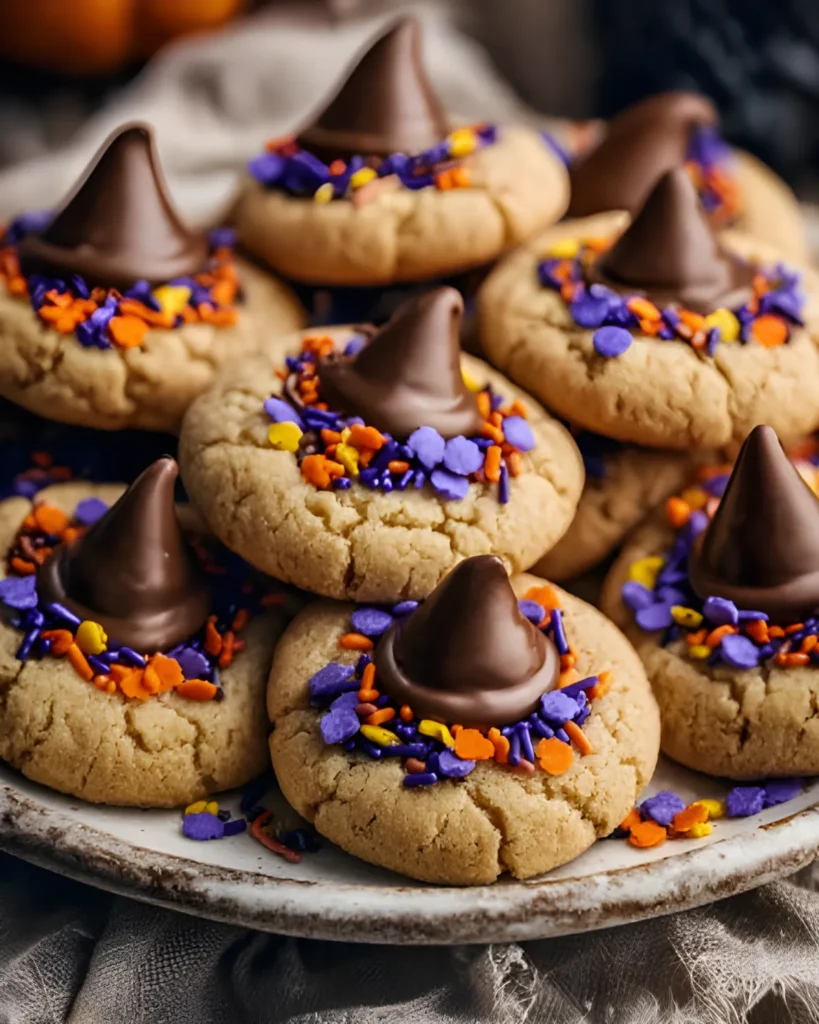
Get ready to enchant your Halloween dessert table with these whimsical Witch Hat Cookies. With a soft, chewy peanut butter cookie base, rich chocolate kisses, and colorful frosting “hats,” these cookies are as fun to make as they are to eat. Perfect for Halloween parties, school treats, or spooky movie nights, this recipe combines classic cookie ingredients with a bit of Halloween magic. In this article, we’ll dive into a playful story, a step-by-step guide, and expert tips to help you bake the ultimate witchy dessert. Plus, we’ll answer all your top Halloween cookie questions at the end.
The Story Behind These Witch Hat Cookies
Halloween magic in every bite
Halloween in our house is always a big deal. From fog machines on the porch to handmade costumes, we go all out—but my favorite tradition? Baking spooky, festive treats with the kids. One October afternoon, I was flipping through old recipe notes when the idea hit me like a broomstick: Witch Hat Cookies. I remembered a similar cookie my grandma made when I was little—hers had a simple chocolate drop, but I wanted more flair. We mixed in vibrant orange and purple frosting, added sprinkles, and voilà—the witch hats came to life. Now, it’s our go-to Halloween cookie every year.
Whether you’re hosting a Halloween party or need a crowd-pleasing classroom treat, Witch Hat Cookies are always a hit. They’re soft, buttery, and just spooky enough to delight kids and grown-ups alike. The best part? They’re surprisingly easy to make, even if you’re not an experienced baker.
We also love making Pumpkin Sugar Cookies and these Red Velvet Cupcakes as part of our Halloween baking lineup, but these little witch hats always disappear first.

Why these Halloween cookies work so well
The texture of the peanut butter cookie base is soft and chewy—perfect for anchoring the “hat.” The contrast of the sweet chocolate kisses and the colorful buttercream frosting makes every bite exciting. Plus, the decorating is half the fun. With just a few ingredients and a splash of gel food coloring, you can create bright, beautiful cookies that feel straight out of a witch’s kitchen.
How to Make Witch Hat Cookies from Scratch
What you’ll need to bake these witchy treats
These Witch Hat Cookies are built on a soft, chewy peanut butter cookie base topped with a chocolate kiss “hat” and piped frosting “brim.” Each bite combines nostalgic flavors with spooky fun. Here’s what you’ll need:
| Ingredient | Amount |
|---|---|
| All-purpose flour | 1¾ cups (218 g) |
| Baking soda | 1 tsp |
| Salt | ¼ tsp |
| Granulated sugar | ½ cup + extra for rolling |
| Light brown sugar | ½ cup |
| Creamy peanut butter | ½ cup |
| Unsalted butter (cookie dough) | ½ cup (113 g) |
| Large egg | 1 |
| Vanilla extract | 1 tsp |
| Chocolate melting wafers | 30 |
| Unsalted butter (frosting) | ½ cup (113 g) |
| Confectioners’ sugar | 1¼ cups (150 g) |
| Heavy cream or milk | 1–2 tbsp |
| Gel food coloring | Orange, purple, green |
| Chocolate kisses | 30, unwrapped |
| Sprinkles | As desired |
Step-by-step instructions for Witch Hat Cookies
Here’s how to make your magical witch hat cookies:
- Preheat and prep
Preheat your oven to 350°F (177°C). Line a baking sheet with parchment paper. - Make the cookie dough
In a large bowl, beat the butter, peanut butter, granulated sugar, and brown sugar until smooth and creamy (about 2 minutes). Add in the egg and vanilla; mix until combined. - Add dry ingredients
In another bowl, whisk together the flour, baking soda, and salt. Gradually add to the wet mixture until a dough forms. - Roll and bake
Scoop 1-inch balls of dough and roll in extra granulated sugar. Place on the baking sheet about 2 inches apart. Bake for 8–10 minutes until edges are lightly golden. - Add the chocolate wafer base
While cookies are still warm, gently press one chocolate wafer into the center of each. - Cool and prep frosting
Let cookies cool completely. Meanwhile, beat butter, confectioners’ sugar, vanilla, salt, and cream until frosting is fluffy. Divide into bowls and tint with food coloring. - Assemble witch hats
Pipe frosting around the base of each wafer, then press a chocolate kiss on top. Decorate with sprinkles to make the hats festive and colorful.
Tips, Variations & Make-Ahead Ideas for Witch Hat Cookies
Decorating tips for fun and flawless Witch Hat Cookies
If you want your Witch Hat Cookies to stand out on the Halloween table, decorating them right is key. Start with cooled cookies—never frost a warm one, or your colorful brim will melt. Use piping bags fitted with round or star tips to control the frosting flow and create a neat brim where the chocolate kiss meets the base.
Use gel food coloring for vibrant results. Orange, purple, and green work great for Halloween. Add sprinkles immediately after piping so they stick well to the buttercream. For a magical look, use edible glitter or metallic sugar crystals. These small details will make your Witch Hat Cookies look like they flew straight out of a storybook.
Want more decorating ideas? Check out these Halloween Cookie Recipes for inspiration. You’ll find that Witch Hat Cookies pair beautifully with themed cupcakes, sugar cookies, and other seasonal sweets.
Flavor variations and clever swaps
While classic peanut butter is the go-to for Witch Hat Cookies, you can change things up to fit your tastes or dietary needs. Use almond butter or sunflower seed butter for a nut-free option. Want chocolate dough? Add two tablespoons of cocoa powder to the flour mixture, or use a chocolate cookie base entirely.
For the hats, feel free to replace the chocolate kisses with mini peanut butter cups or truffles. Instead of melting wafers, use thin chocolate-covered cookies as the base of the hat.
Need to prep ahead? Bake the cookies in advance and freeze them (undecorated) for up to a month. On party day, thaw and decorate. These Witch Hat Cookies are just as fun to make ahead as they are to eat fresh.
Looking for more spook-tacular ideas? Explore our Halloween Baking collection for hauntingly good recipes.

Serving, Storing & Spooky Presentation Ideas
How to serve Witch Hat Cookies at Halloween parties
Presentation makes all the difference! Serve these Witch Hat Cookies on a black tray sprinkled with edible glitter or crushed Oreos to look like “witch dust.” You can arrange them in a circle on a cauldron-shaped platter or place them in clear treat bags tied with orange ribbon for classroom handouts or party favors.
They also pair perfectly with themed drinks like green punch or steaming cocoa. If you’re making a dessert table, layer them with other favorites like spider web brownies and our kid-approved Ghost Sugar Cookies for a hauntingly good time.
Storing and making ahead
Once fully decorated, store cookies in an airtight container at room temperature for up to 4 days. If you’re stacking them, place parchment paper between layers to protect the frosting.
If you’re short on time, bake the cookies a day or two ahead and decorate the day of your event. You can also freeze the undecorated cookie bases for up to 1 month. Just thaw at room temperature before assembling the hats.
These cookies hold up well for party prep and can easily be transported without losing their charm. For more batch-friendly recipes, explore our growing list of Halloween Desserts that look impressive and taste amazing.
Need more recipes ? Follow me on Pinterest.
Print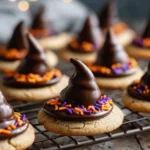
Witch Hat Cookies – Ultimate Halloween Treat
- Total Time: 30 minutes
- Yield: 30 cookies 1x
- Diet: Vegetarian
Description
Witch Hat Cookies are a fun Halloween treat made with peanut butter cookie bases, chocolate kisses, and colorful frosting. Perfect for parties and baking with kids.
Ingredients
1 ¾ cup all-purpose flour
1 tsp baking soda
¼ tsp salt
½ cup granulated sugar + more for rolling
½ cup light brown sugar
½ cup creamy peanut butter
½ cup unsalted butter, room temperature
1 large egg
1 tsp vanilla extract
30 chocolate melting wafers
½ cup unsalted butter (for frosting)
1 ¼ cups confectioners’ sugar
1–2 tbsp heavy cream or milk
Gel food coloring: orange, purple, green
30 chocolate kisses, unwrapped
Sprinkles
Instructions
1. Preheat oven to 350°F (177°C) and line a baking sheet with parchment paper.
2. In a bowl, beat butter, peanut butter, granulated sugar, and brown sugar until creamy.
3. Add egg and vanilla; mix until smooth.
4. In a separate bowl, whisk flour, baking soda, and salt. Gradually mix into wet ingredients.
5. Roll dough into 1-inch balls, coat with sugar, and place on baking sheet.
6. Bake for 8–10 minutes until lightly golden.
7. Immediately press a chocolate wafer into the center of each warm cookie. Cool completely.
8. Beat frosting ingredients until fluffy, divide and tint with gel food coloring.
9. Pipe frosting around the base of each wafer. Press chocolate kiss on top.
10. Decorate with sprinkles and let set before serving.
Notes
Let cookies cool fully before decorating.
Use parchment paper between layers if storing stacked cookies.
Substitute almond butter or sugar cookie dough for variations.
- Prep Time: 20 minutes
- Cook Time: 10 minutes
- Category: Halloween Cookies
- Method: Baking
- Cuisine: American
Nutrition
- Serving Size: 1 cookie
- Calories: 180
- Sugar: 16g
- Sodium: 85mg
- Fat: 9g
- Saturated Fat: 4.5g
- Unsaturated Fat: 3g
- Trans Fat: 0g
- Carbohydrates: 22g
- Fiber: 1g
- Protein: 2g
- Cholesterol: 15mg