
Whether you’re hosting a spooky bash or just looking to bake something festive, this guide will help you whip up delicious and eye-catching spiderweb brownies. We’ll walk through how to create the perfect fudgy base, melt white chocolate for the web design, and get your Halloween dessert table looking truly BOO-tiful. Let’s kick things off with a little backstory…
Where Sweet Meets Spooky – The Story Behind Spiderweb Brownies
It all started with a Halloween party I threw years ago—just a few friends, some carved pumpkins, and a spread of themed snacks. I wanted something simple but fun, and that’s when I first made spiderweb brownies. Fudgy, rich, and dressed in white chocolate webs, they were the first treat to disappear. People were asking for the recipe before they’d even wiped the chocolate off their fingers.
Back then, I didn’t have the piping bags or fancy tools. I melted white chocolate in a mug, snipped a corner of a ziplock, and started doodling. The result? Wobbly, imperfect spiderwebs—but that made them even more charming. These brownies have since become my go-to for every Halloween party, especially when paired with festive drinks like pumpkin chai or sweet treats like mummy cupcakes.
The magic of spiderweb brownies isn’t just in their looks. It’s the deep chocolate flavor, the soft, dense center, and the satisfying snap of cooled white chocolate on top. They’re easy to make, kid-friendly, and totally adaptable—fancy them up with edible glitter or chocolate spiders, or keep it simple and sweet.
Halloween is all about playful creativity, and these brownies deliver exactly that. Whether you’re serving them on a platter or sneaking one before the party starts, you’ll be hooked.

How to Make Spiderweb Brownies Step-by-Step
Mix, Melt, and Bake to Fudgy Perfection
The foundation of perfect spiderweb brownies starts with a classic brownie batter—rich, dense, and not too cakey. Begin by preheating your oven to 350°F and greasing a 9×13-inch pan. In a microwave-safe bowl, melt the unsweetened chocolate with the butter. Stir until smooth and glossy.
Next, mix in the sugar while the chocolate mixture is still warm. This helps give the brownies that signature shiny top. One egg at a time goes in next, followed by the vanilla extract. In a separate bowl, whisk together the flour, baking powder, and salt. Add the dry ingredients to the wet in batches, folding gently to avoid overmixing.
Pour the batter into your prepared pan and smooth the top. Bake for 25 to 30 minutes. You want the center set but still soft. A toothpick should come out with moist crumbs—not dry.
Let your brownies cool completely before decorating. This step is essential. If they’re even slightly warm, your melted white chocolate will slide right off.
Looking for a brownie that’s more traditional? Try our fudgy chocolate brownies or salted caramel brownies next time for non-Halloween occasions.

Creating the Spiderweb Design with White Chocolate
Once your spiderweb brownies are cool, it’s time for the fun part—decorating. Combine white chocolate chips and heavy cream, and gently melt them in short bursts in the microwave or over a double boiler. Stir until smooth and pour into a piping bag or a plastic bag with a tiny corner snipped off.
Pipe concentric circles over the brownies—start from the center and work your way out. Then take a toothpick and drag lines outward through the circles to create a spiderweb pattern.
Don’t stress about perfection! Uneven lines give your spiderwebs a haunted look that’s totally on-theme. For extra flair, add chocolate spider candies or dust with edible glitter. These simple touches turn this easy Halloween food into a dessert table centerpiece.
Serving Ideas & Halloween Party Magic
How to Serve Spiderweb Brownies for Maximum Impact
Presentation makes all the difference—especially when it comes to Halloween treats. Once your spiderweb brownies are decorated and the glaze has set, cut them into neat squares or spooky shapes using Halloween-themed cookie cutters. Triangles, ghosts, or even spider shapes turn these fudgy delights into edible art.
If you’re setting up a full Halloween dessert table, display the brownies on a black or purple cake stand for a pop of contrast. Scatter candy eyeballs, plastic spiders, or Halloween confetti around the tray for a complete effect. These little touches help your spiderweb brownies stand out among other spooky snacks.
Want to go even bigger? Serve them with monster cookies or alongside a cauldron of Halloween punch. Together, they make your party table truly scream-worthy.
These brownies are also perfect for classroom parties or bake sales. Just package them in themed treat bags, tie with orange ribbon, and you’re ready to delight kids and adults alike.
Pairing with Festive Drinks and Other Halloween Food
Every Halloween party needs drinks as fun as the desserts. These spiderweb brownies pair perfectly with hot chocolate, pumpkin lattes, or spooky-themed mocktails. You could even set up a mini brownie and drink station to let guests customize their pairing.
As for savory options, balance the sweetness by offering simple pumpkin cheese balls or mummy hot dogs. When your food is on theme but not overly complicated, everyone wins—especially the host.
Whether you’re going spooky-cute or full-on haunted, your party menu is in good hands with spiderweb brownies as the star.

Storing & Customizing Your Spiderweb Brownies
Make-Ahead Tips and Storage That Keep Them Fresh
The best part about spiderweb brownies? You can absolutely make them ahead of your party. Once baked and cooled, they’ll stay soft and fudgy for up to 3 days if stored properly. Simply place them in an airtight container and keep them at room temperature. If your house runs warm, pop them in the fridge—but bring to room temp before serving for maximum gooeyness.
If you’re prepping a few days in advance, wait to decorate until the day of. The white chocolate spiderweb looks and tastes best fresh. You can melt and pipe the glaze in under 10 minutes, so it’s easy to do last-minute.
Want to freeze them? Yes, you can! Freeze uncut brownies (without the spiderweb) wrapped tightly in plastic wrap and foil for up to 2 months. Thaw overnight in the fridge and decorate just before serving.
For big batches, consider doubling the recipe and baking in two pans. It’s a lifesaver for bake sales or kids’ school parties, especially when paired with easy Halloween cookies that store just as well.
Flavor Variations to Try After Halloween
While these spiderweb brownies are perfect for Halloween, you don’t have to limit them to October. Skip the web and instead drizzle peanut butter, caramel, or raspberry sauce over the top for a seasonal twist.
You could even swap in dark chocolate or swirl in cream cheese for a layered effect. Hosting a winter party? Add peppermint extract to the batter and top with crushed candy canes. Same base recipe—new vibe.
And for a truly over-the-top dessert table, slice the brownies small and layer them into Halloween trifle cups. Guests get individual servings, and you get extra wow factor.
No matter how you tweak them, the core of these brownies remains rich, moist, and dangerously chocolatey. Once you’ve made them once, you’ll be reaching for this recipe again and again.
FAQ About Spiderweb Brownies
How do you make a spiderweb design on brownies ?
After your brownies are completely cooled, pipe concentric circles of melted white chocolate on top. Then, use a toothpick or skewer to drag lines from the center outward to form a spiderweb effect. Don’t worry about perfect lines—imperfection adds charm!
Can I use white icing instead of melted white chocolate ?
Yes, you can substitute white icing if you’re short on time or don’t want to melt chocolate. However, melted white chocolate provides a firmer set and a shinier finish, which holds up better for display and storage.
How far ahead can I make spiderweb brownies ?
You can bake the brownies up to 3 days ahead. Store them in an airtight container at room temperature. For best visual impact, add the spiderweb decoration on the day of your event.
What other Halloween treats pair well with brownies ?
These brownies go great with Halloween sugar cookies, mummy cupcakes, and monster cookies. Add festive drinks like Halloween punch to complete the spread.
Conclusion
Spiderweb brownies are more than just a holiday treat—they’re a festive, easy, and creative way to bring your dessert table to life. Whether you’re baking them for a party, classroom celebration, or spooky movie night at home, they always deliver.
With a rich chocolate base and eye-catching white chocolate web design, they strike the perfect balance between spooky and sweet. Plus, they’re flexible enough to be made ahead, decorated last-minute, or customized with your own twist.
Get ready to impress guests, excite kids, and enjoy every chocolatey bite. Halloween just got tastier—and a whole lot more fun.
Need more recipes? Follow me on Pinterest.
Print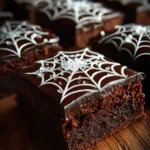
Spiderweb Brownies – 3 Irresistible Ways to Decorate This Halloween
- Total Time: 45 minutes
- Yield: 16 brownies 1x
- Diet: Vegetarian
Description
These irresistible spiderweb brownies are rich, chocolatey, and perfect for Halloween. A smooth white chocolate web adds spooky flair, making them the star of any dessert table. Easy to make, fun to decorate, and even better to eat!
Ingredients
**For the Brownies**
1 cup (2 sticks) unsalted butter
4 oz unsweetened chocolate, chopped
2 cups granulated sugar
4 large eggs
1 tsp vanilla extract
1 cup all-purpose flour
½ tsp baking powder
¼ tsp salt
**For the Spiderweb Glaze**
½ cup white chocolate chips
¼ cup heavy cream
Instructions
1. Preheat oven to 350°F (175°C). Grease and flour a 9×13 inch baking pan.
2. Melt butter and unsweetened chocolate in a double boiler or microwave. Stir until smooth.
3. Stir in sugar until fully combined.
4. Beat in eggs one at a time, then add vanilla extract.
5. In a separate bowl, whisk flour, baking powder, and salt.
6. Gradually add dry ingredients to the wet, mixing gently until just combined.
7. Pour batter into prepared pan and smooth the surface.
8. Bake 25–30 minutes, until a toothpick comes out with moist crumbs.
9. Cool brownies completely in the pan.
10. Melt white chocolate chips and heavy cream until smooth.
11. Transfer glaze to a piping bag or plastic bag with corner snipped.
12. Pipe concentric circles, then drag a toothpick outward to create spiderweb design.
13. Let set. Cut into squares and serve.
Notes
For extra Halloween flair, top with candy spiders or edible glitter.
Best served same day, but can be made 1–2 days ahead.
Freeze uncut brownies (without web) for up to 2 months.
- Prep Time: 15 minutes
- Cook Time: 30 minutes
- Category: Dessert, Halloween
- Method: Baking
- Cuisine: American
Nutrition
- Serving Size: 1 brownie
- Calories: 285
- Sugar: 24g
- Sodium: 95mg
- Fat: 16g
- Saturated Fat: 10g
- Unsaturated Fat: 5g
- Trans Fat: 0g
- Carbohydrates: 35g
- Fiber: 1g
- Protein: 3g
- Cholesterol: 75mg

2 thoughts on “Spiderweb Brownies – 3 Irresistible Ways to Decorate This Halloween”
Comments are closed.