Japanese Katsu Bowls Origins & Comfort Appeal
Subheading: Why Japanese Katsu Bowls Feel So Comforting
I still remember the first time I made Japanese Katsu Bowls at home. It was a rainy Sunday, and I wanted something warm, crispy, and deeply satisfying. I had tasted katsu at a small neighborhood spot, and that crunchy coating stayed in my mind. So I tried recreating it. The moment I sliced into that golden crust and saw the juicy chicken inside, I knew this dish would become a regular in my kitchen.
Japanese Katsu Bowl combine crispy breaded cutlets with soft rice and rich tonkatsu sauce. Because the textures contrast so beautifully, every bite feels balanced. The crunch meets the tenderness. The sweet-savory sauce ties everything together.
Moreover, Japanese Katsu Bowls make weeknight dinners feel special. While many Asian recipes require complex ingredients, this one stays simple and practical. That’s why it stands out among Asian dishes.
If you love bold flavors like those in this Teriyaki Chicken Bowl or crave crispy textures similar to Crispy Chicken Sandwich , you’ll appreciate how satisfying katsu can be.
Subheading: Chicken vs Pork Katsu – Which One Wins?
Traditionally, Japanese Katsu Bowls feature pork (tonkatsu). However, chicken katsu has become equally popular. Both versions use the same breading method.
| Type | Flavor Profile | Best For |
|---|---|---|
| Chicken Katsu | Light, juicy, mild | Healthy dinner option |
| Pork Tonkatsu | Rich, savory, classic | Traditional Asian dishes |
Personally, I switch between both depending on what I have in the fridge. Either way, Japanese Katsu Bowls never disappoint.
How to Make Japanese Katsu Bowls Perfectly Crispy
Subheading: The Secret to Ultra-Crispy Japanese Katsu Bowl
If you want restaurant-quality Japanese Katsu Bowls, you must focus on technique. While the ingredient list looks simple, execution makes all the difference.
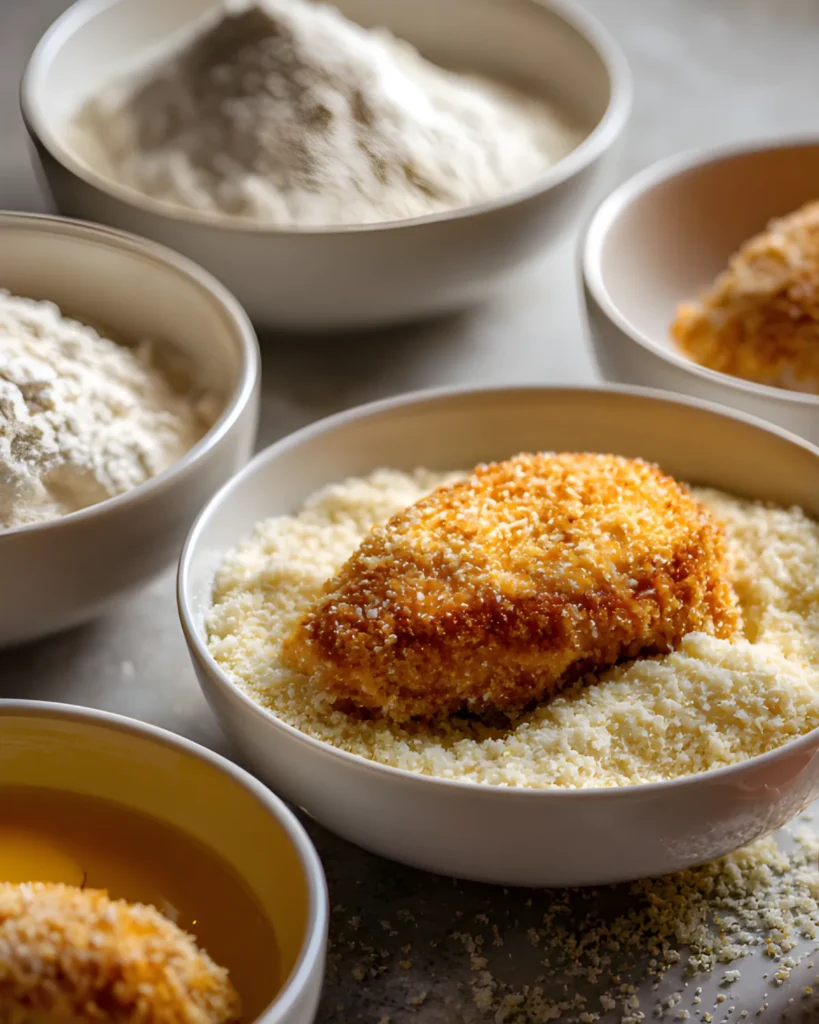
First, always pound the chicken or pork to an even ½-inch thickness. This step ensures even cooking. Moreover, uniform thickness prevents dry edges and undercooked centers.
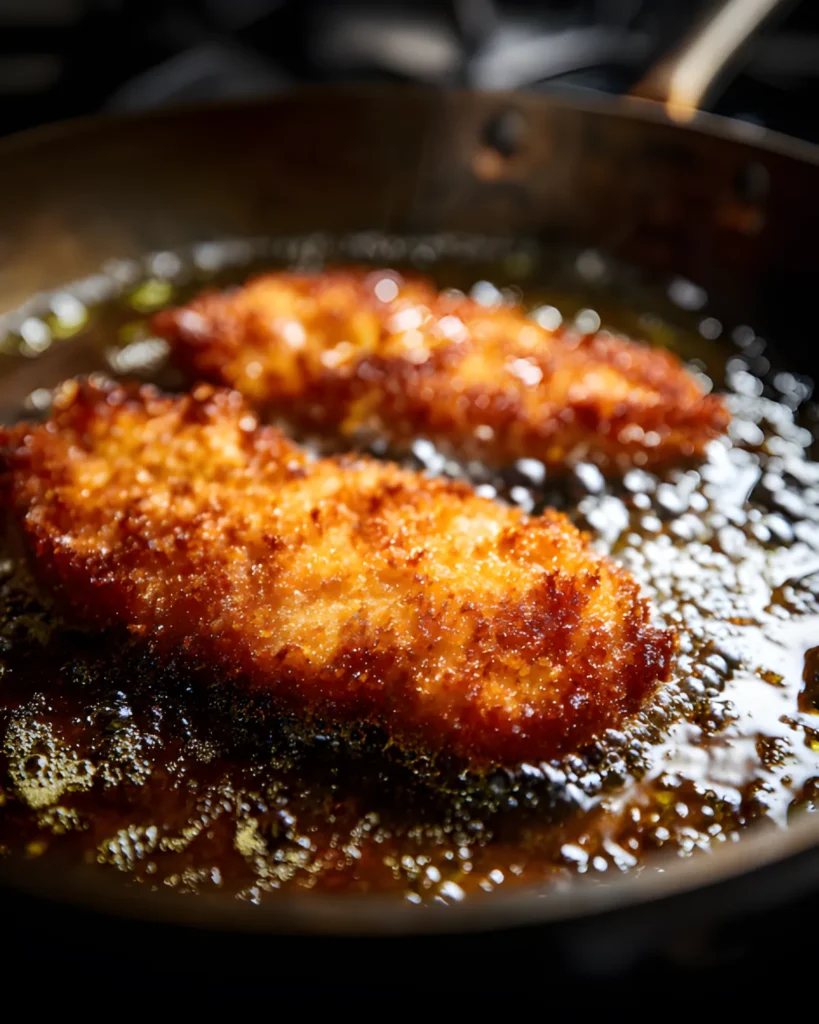
Next, set up your breading station properly. Coat the cutlet in flour first. Then dip it in beaten eggs. Finally, press it firmly into panko breadcrumbs. Unlike regular breadcrumbs, panko creates a lighter and crispier crust. Because panko contains larger flakes, it traps more air during frying.
Additionally, heat the oil to 350°F (175°C). If the oil runs too cool, the coating absorbs excess oil. If it runs too hot, the crust browns before the inside cooks. Therefore, use a thermometer for accuracy.
Once golden, transfer the cutlets to a paper towel-lined plate. Let them rest briefly before slicing. This short rest keeps juices locked inside.
If you enjoy crispy textures like those in this Fried Chicken Tenders recipe or crave comforting rice-based meals like this Chicken Fried Rice , you’ll appreciate how Japanese Katsu Bowls combine both elements beautifully.
Subheading: Homemade Tonkatsu Sauce vs Store-Bought
Tonkatsu sauce defines Japanese Katsu Bowls. While store-bought versions taste great, homemade sauce gives you full control.
Simply mix:
- 3 tbsp ketchup
- 2 tbsp Worcestershire sauce
- 1 tbsp soy sauce
- 1 tsp sugar
Stir until smooth. Taste and adjust sweetness if needed.
The result tastes tangy, slightly sweet, and deeply savory. Because the sauce balances richness from the fried cutlet, it transforms simple rice and meat into one of the most interesting food recipes you can make at home.
| Option | Pros | Best For |
|---|---|---|
| Store-Bought | Convenient, consistent flavor | Quick weeknight meals |
| Homemade | Adjustable sweetness & salt | DIY food recipes lovers |
Healthy Japanese Katsu Bowls Variations & Customizations
Subheading: Turning Japanese Katsu Bowl into a Healthy Dinner
Japanese Katsu Bowls feel indulgent, yet you can easily turn them into a healthy dinner with smart swaps. While the traditional version uses white rice and deep frying, small adjustments create a lighter bowl without sacrificing flavor.
First, consider baking or air frying instead of deep frying. Spray the breaded cutlets lightly with oil, then bake at 400°F until golden and cooked through. This method reduces excess oil while keeping the crispy texture intact.
Next, swap white rice for brown rice or cauliflower rice. Brown rice adds fiber and keeps you fuller longer. Meanwhile, cauliflower rice lowers carbohydrates while maintaining that bowl-style experience.
Additionally, add fresh vegetables. Shredded cabbage, steamed broccoli, edamame, or sliced cucumbers bring crunch and balance. Because Japanese Katsu Bowls already deliver rich flavor, fresh vegetables brighten the dish naturally.
If you enjoy balanced meals like this Healthy Chicken Bowl or plant-based options similar to this Easy Hummus Recipe , you’ll love customizing your bowl to match your nutrition goals.
Subheading: Creative Bowl Ideas Inspired by Asian Recipes
One reason Japanese Katsu Bowl rank among the most interesting food recipes is their versatility. You can transform them into countless Asian dishes with small twists.
For example, add a soft-boiled egg for richness. Drizzle spicy mayo for heat. Or include pickled vegetables for contrast. Each variation builds layers of flavor while keeping the core structure intact.
You can even create fusion versions:
- Add avocado slices for creaminess
- Use jasmine rice for a fragrant twist
- Top with sesame seeds for extra crunch
| Add-On | Flavor Boost | Texture |
|---|---|---|
| Soft-Boiled Egg | Rich & savory | Creamy |
| Pickled Veggies | Tangy & bright | Crunchy |
Because Japanese Katsu Bowls adapt easily, they fit both traditional Asian recipes and modern DIY food recipes perfectly.
Serving, FAQs & Final Tips for Japanese Katsu Bowls
Subheading: How to Assemble Japanese Katsu Bowls Like a Pro
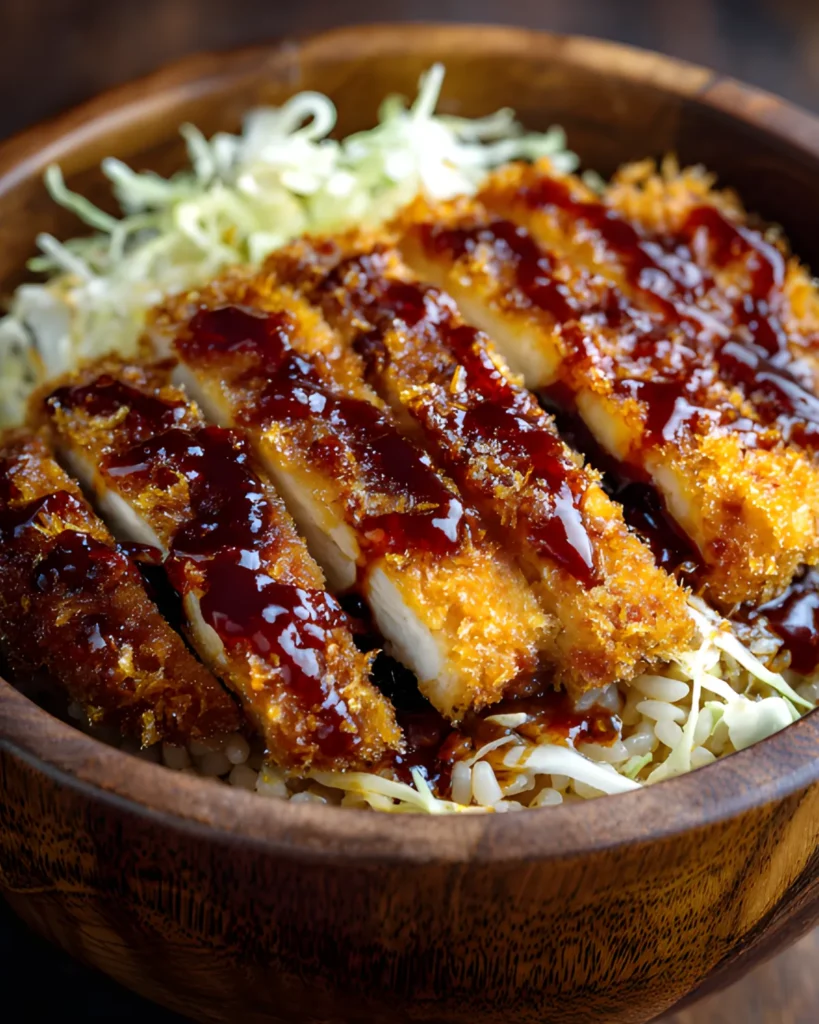
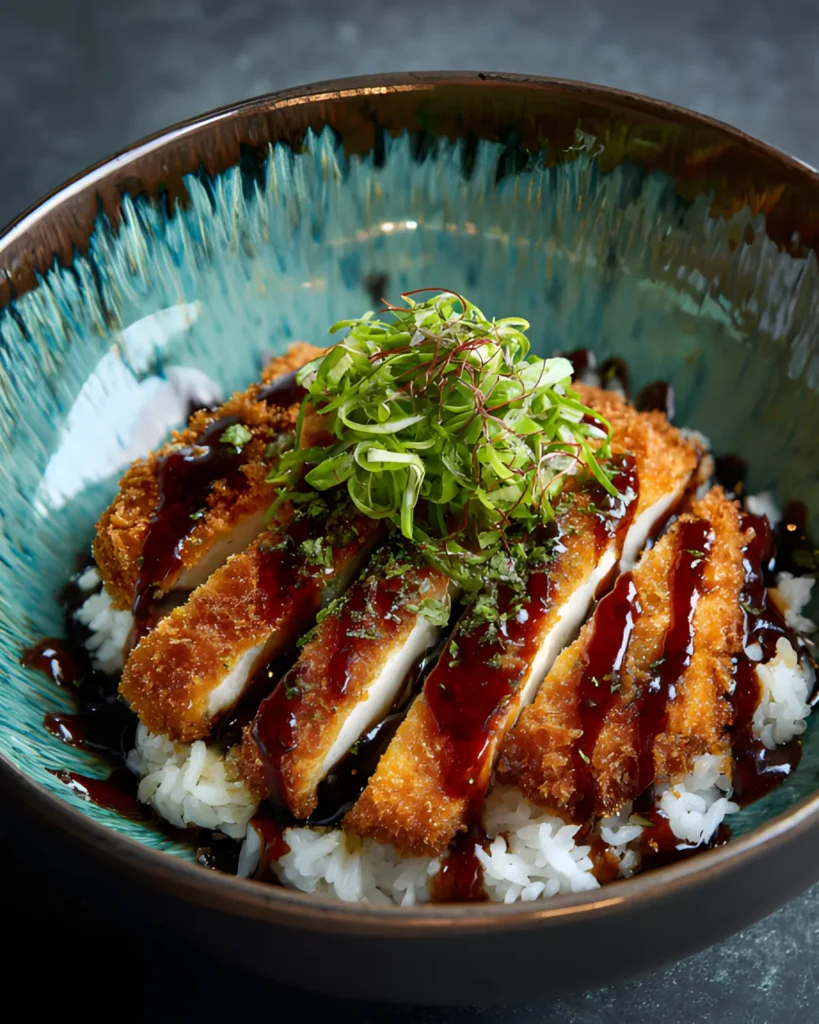
Japanese Katsu Bowls look impressive, yet assembly stays simple. First, add hot cooked rice to the bottom of the bowl. Sushi rice works best because it stays slightly sticky and holds everything together. Then slice the crispy cutlet into even strips. Always use a sharp knife to protect the crunchy crust.
Next, place the sliced katsu neatly over the rice. Drizzle tonkatsu sauce generously across the top. However, avoid drowning the crust completely. Instead, leave some areas crisp for texture contrast.
After that, add garnish. Sprinkle chopped green onions or fresh parsley. Add shredded cabbage for freshness. Finally, serve immediately while the cutlet remains crispy.
If you enjoy beautifully layered food dishes like this Korean Beef Bowl or crave comforting rice meals similar to this Garlic Butter Chicken and Rice , you’ll appreciate how visually stunning Japanese Katsu Bowls appear.
Subheading: Common Mistakes to Avoid
Even simple Asian dishes require attention to detail. Therefore, avoid these mistakes:
- Skipping the flour layer (the coating won’t stick properly)
- Frying at the wrong temperature
- Overcrowding the pan
- Slicing before resting
Because Japanese Katsu Bowls rely on texture, small errors can affect the final result.
FAQ Section
PAA1: What is the difference between katsu and tonkatsu sauce?
Katsu refers to the breaded and fried cutlet itself. Tonkatsu sauce is the thick, sweet-savory sauce served on top. Japanese Katsu Bowls combine both elements for full flavor.
PAA2: Can I bake katsu instead of frying?
Yes. Bake at 400°F after spraying lightly with oil. While frying gives maximum crispiness, baking creates a lighter healthy dinner option.
PAA3: What rice works best for Japanese Katsu Bowls?
Sushi rice works best because it has a sticky texture. However, jasmine rice or brown rice also work well.
PAA4: Can I make tonkatsu sauce ahead of time?
Yes. Store homemade tonkatsu sauce in an airtight container in the refrigerator for up to one week.
Conclusion
Japanese Katsu Bowl deliver everything you want in a comforting meal—crispy texture, fluffy rice, and bold tonkatsu sauce. Whether you choose chicken or pork, fry or bake, traditional or modern variations, this dish remains one of the most interesting food recipes you can master at home. Moreover, because it adapts easily, it fits both indulgent cravings and healthy dinner goals. From classic Asian recipes to creative DIY food recipes, Japanese Katsu Bowls deserve a spot in your weekly rotation. So grab your panko, heat your oil, and create a bowl that would make Bon Appétit proud.
Personal Story
Hi, I’m Ethan—the cook, creator, and voice behind this cozy corner of the web! My love for Japanese Katsu Bowl started in my small kitchen while recreating a dish I once tasted at a local restaurant. Watching simple ingredients transform into crispy, golden perfection reminded me why I fell in love with cooking. On this blog, I share comfort-food classics and creative twists that anyone can master. This katsu bowl blends crunch, flavor, and warmth into one unforgettable meal. Pull up a chair, grab your favorite mug, and let’s cook something wonderful together.
Print
Japanese Katsu Bowls – 5 Powerful Secrets for Ultimate Crisp
- Total Time: 30 minutes
- Yield: 2 servings 1x
Description
Japanese Katsu Bowls with crispy chicken or pork cutlets, fluffy rice, and rich homemade tonkatsu sauce.
Ingredients
2 boneless chicken breasts or pork loin cutlets (pounded to ½-inch thickness)
1 cup panko breadcrumbs
½ cup all-purpose flour
2 large eggs (beaten)
3 cups cooked white rice (sushi rice preferred)
½ cup tonkatsu sauce
Oil for frying (vegetable or canola)
Fresh parsley or green onion for garnish
Instructions
1. Pound chicken to ½-inch thickness and season with salt and pepper.
2. Set up three bowls: flour, beaten eggs, and panko.
3. Coat cutlet in flour, dip in egg, then press into panko.
4. Heat oil to 350°F (175°C).
5. Fry 3–4 minutes per side until golden and cooked through.
6. Mix tonkatsu sauce ingredients if making homemade.
7. Assemble bowls with rice, sliced katsu, and drizzle sauce.
8. Garnish and serve immediately.
Notes
Bake at 400°F for 18–20 minutes for a lighter option.
Use sushi rice for authentic texture.
Do not overcrowd the pan while frying.
- Prep Time: 15 minutes
- Cook Time: 15 minutes
- Category: Dinner
- Method: Frying
- Cuisine: Japanese
Nutrition
- Serving Size: 1 bowl
- Calories: 620
- Sugar: 8g
- Sodium: 780mg
- Fat: 28g
- Saturated Fat: 6g
- Unsaturated Fat: 18g
- Trans Fat: 0g
- Carbohydrates: 65g
- Fiber: 3g
- Protein: 32g
- Cholesterol: 165mg