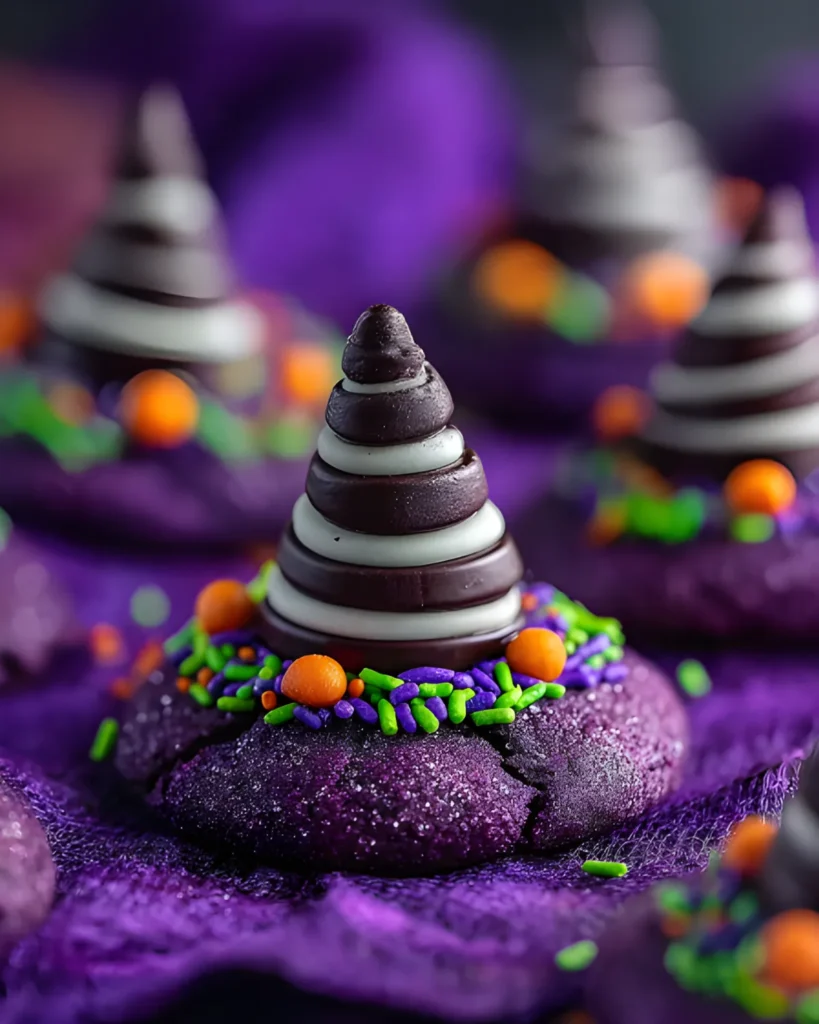
If you’re planning a Halloween cookie decorating party or just want a festive treat that screams “spooky and sweet,” Halloween Witch Hat Cookies are your go-to. These colorful peanut butter cookies are topped with chocolate kisses, rolled in Halloween sprinkles, and shaped to look like tiny witch hats. This recipe blends nostalgic baking fun with a pinch of magic—and the best part? You don’t need to be a decorating pro to make them look spellbinding. Let’s dive into this Halloween cookie recipe that’s sure to cast a delicious spell on anyone who takes a bite.
A Witchy Cookie Tradition to Love
A Memory Baked into Every Hat
Hi, I’m Ethan—the cook and cozy creator behind this kitchen of memories. Halloween has always been one of my favorite times to bake, and few recipes capture the season like these Halloween Witch Hat Cookies. The first time I made them, it was with my niece at a Halloween cookie decorating party. She was more interested in pouring sprinkles than anything else, but the joy we shared stuck with me.
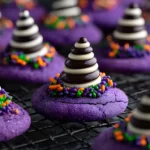
These cookies are all about creating magic in the kitchen without stress. Soft, chewy peanut butter cookies dyed a vibrant purple, rolled in Halloween sprinkles, and topped with chocolate kisses to form the perfect witch hat shape—it’s everything festive baking should be. They remind me of Christmas baking cookies, only dressed up for spooky season.

Why Halloween Witch Hat Cookies Are a Must-Bake
What makes Halloween Witch Hat Cookies so great? They’re easy to decorate, fun to bake with kids, and a showstopper at Halloween gatherings. Whether you’re packing them for school, baking for a costume party, or simply treating yourself while watching your favorite spooky movie, these cookies deliver that wow factor without requiring professional skills.
The best part? They hold their shape beautifully and come together with ingredients you probably already have. And if you’re already baking Halloween Red Velvet Cupcakes or Halloween Blondie Bars, these cookies make the perfect addition to your treat table.
Halloween Witch Hat Cookies are more than just sweets—they’re edible fun, a memory in the making, and the easiest way to spread a little spooky-season cheer.
Simple Ingredients, Magical Results
What You’ll Need for Halloween Witch Hat Cookies
The beauty of Halloween Witch Hat Cookies lies in how simple the ingredients are. Most of these items are pantry staples, and yet, together, they form cookies that look like they took hours of effort. Here’s what goes into the magic:
| Ingredient | Purpose |
|---|---|
| All-purpose flour | Forms the base structure of the cookie |
| Cornstarch | Keeps cookies soft and thick |
| Baking soda & baking powder | Provides lift and structure |
| Unsalted butter | Adds richness and flavor |
| Peanut butter | Delivers moisture and classic cookie taste |
| Sugar & egg | Sweetens and binds the dough |
| Vanilla extract | Adds depth of flavor |
| Purple gel food coloring | Gives the cookies their witchy hue |
| Halloween sprinkles | Adds festive flair and texture |
| Kisses chocolate | Tops the cookie as the witch hat point |
This isn’t just a cookie recipe—it’s a creative craft project for your oven.
Why These Ingredients Make the Cookie Magical
Each ingredient in Halloween Witch Hat Cookies plays a delicious role. The flour and cornstarch combo gives structure while keeping the cookies thick and tender. Peanut butter not only enhances the flavor but also improves the chewy texture, which contrasts perfectly with the chocolate kiss on top.
What really makes this cookie stand out visually is the purple gel food coloring and Halloween sprinkles. That bright pop of color catches the eye on any Halloween cookie tray. Just like Pumpkin Sugar Cookies show off autumn’s warmth, these cookies pop with vibrant, spooky charm.
And the chocolate kiss? It’s the defining witchy detail. Pressed gently into the center after baking, it transforms your dough into a festive witch hat cookie centerpiece. It’s no wonder these cookies are becoming Halloween party staples alongside favorites like Pumpkin Cheesecake Cookies.
Whether you’re baking for fun or a full-blown Halloween cookie decorating party, these ingredients deliver the magic every time.
How to Make Witch Hat Cookies Like a Pro
Step-by-Step Instructions for Spooky Perfection
Making Halloween Witch Hat Cookies might look fancy, but the process is surprisingly simple. Follow these six steps, and you’ll have festive treats that impress with minimal effort.
Step 1: Prep the dry mix
In a large bowl, whisk together the all-purpose flour, cornstarch, baking soda, baking powder, and salt. Set it aside. This mix forms the structural base of your cookies and helps them hold their shape.
Step 2: Cream the wet ingredients
Use an electric mixer to beat the softened butter and sugar until light and fluffy—about two minutes. Add the egg, peanut butter, and vanilla extract. Mix until smooth.
Step 3: Combine and color
Add the dry mix to the wet and stir until fully combined. Now, add a few drops of purple gel food coloring and mix thoroughly until evenly colored. Don’t overdo the food dye—a little goes a long way!
Step 4: Scoop and chill
Scoop the dough into 1-tablespoon mounds and place them close together on a lined tray. Cover and chill for at least two hours. This step is crucial for keeping your Halloween Witch Hat Cookies thick and round during baking.
Step 5: Coat and bake
Preheat the oven to 350°F (175°C). Roll each chilled dough ball in Halloween sprinkles or purple sanding sugar. Arrange on new lined trays and bake for 9–11 minutes. Look for puffed, slightly cracked tops.
Step 6: Add the chocolate hat
Cool the cookies for five minutes. Press a chocolate kiss gently into the center of each one. Immediately transfer the tray to the freezer for 10 minutes to set the chocolate and preserve that signature witch hat point.
Tips to Avoid Common Mistakes
Even a simple recipe like this can go sideways without a few insider tips. First, always chill your dough—it prevents spreading and keeps the cookies soft yet sturdy. Don’t skip the cooling step either. If your cookies are too warm, the chocolate kisses will melt and slide off.
Second, use parchment paper instead of greasing your tray. It ensures even baking and easy cleanup. And don’t rush the decorating! Sprinkle while the chocolate is still tacky so they stick beautifully.
These tiny details are what transform ordinary Halloween cookies into unforgettable Halloween Witch Hat Cookies.
Want more Halloween decorating fun? Try pairing them with Halloween Mummy Cupcakes or spooky-sweet Halloween Oreo Bark. They make the ultimate party spread and look incredible together on a tray.

Decorating Tips & Easy Storage for Halloween Witch Hat Cookies
Creative Ways to Decorate and Personalize
These cookies are fun, festive, and totally customizable. Once you master the basics of Halloween Witch Hat Cookies, you can start getting creative with colors and flavors. Swap in pumpkin spice cookie dough for an autumn twist or try chocolate cookie dough for a deeper, witchier look.
At your Halloween cookie decorating party, set up a DIY station with sprinkles, colored sugars, and extra candies. Kids will love making their own versions, and guests can take part in the fun too. Use classic purple, orange, and black decorations to match the spooky theme.
You can even pair them with Halloween Oreo Bark or Witch Hat Brownies for a dessert table that’s both playful and picture-perfect.
How to Store and Make Ahead
One reason Halloween Witch Hat Cookies are so popular for parties is how easy they are to store. Keep them in an airtight container at room temperature for up to five days. They’ll stay soft, chewy, and delicious.
If you’re baking in advance, freeze the cooled cookies in layers separated by parchment paper. Let them thaw for 30 minutes at room temp, and they’ll be ready to enjoy.
Hosting outdoors or in warm weather? Store them in the fridge to keep the chocolate kisses firm. These cookies are as practical as they are fun—ideal for parties, gift bags, or late-night snacks during scary movie marathons.
Conclusion
There’s nothing quite like baking cookies that bring joy, color, and a little magic into your kitchen. This recipe checks all those boxes. With rich flavor, chewy texture, and a playful design, it’s a treat both kids and adults will love.
Baking these cookies isn’t just about following steps—it’s about creating memories. Rolling dough, dipping in sprinkles, and placing that chocolate kiss on top makes the process feel festive from start to finish.
They’re great for make-ahead prep too. Whether you freeze them for later or bake a fresh batch the night before, these cookies keep their shape and flavor beautifully. They’re also a hit at parties, especially when paired with other themed treats like Halloween Mummy Cupcakes.
If you enjoy baking around the holidays, this is a recipe worth adding to your seasonal favorites. It combines charm, ease, and flavor in every bite.
So pull out your baking sheet and make your kitchen smell like fall. With a few simple ingredients and a bit of creativity, you’ll soon have a tray of Halloween Witch Hat Cookies ready to share—or keep all to yourself. However you enjoy them, they’re sure to become a festive favorite.
Need more recipes? Follow me on Pinterest.
Halloween Witch Hat Cookies: Easy, Fun & Festive Recipe
- Total Time: 2 hours 30 minutes
- Yield: 33 cookies 1x
- Diet: Vegetarian
Description
Festive Halloween Witch Hat Cookies made with peanut butter dough, Halloween sprinkles, and chocolate kisses. Fun to make and perfect for parties.
Ingredients
1 1/2 cups all-purpose flour
2 tsp cornstarch
1/2 tsp baking soda
1/4 tsp baking powder
1/8 tsp fine sea salt
1/2 cup unsalted butter, softened
1 cup white sugar
1 large egg
3/4 cup smooth peanut butter
1 tsp vanilla extract
Purple gel food coloring
Halloween sprinkles or purple sanding sugar
33 chocolate kisses or hugs candies, unwrapped
Instructions
1. Line a sheet tray with parchment paper. In a bowl, whisk together flour, cornstarch, baking soda, baking powder, and salt.
2. Cream butter and sugar until light and fluffy. Add egg, peanut butter, and vanilla, and mix until smooth.
3. Add dry ingredients to wet and stir to combine. Add purple gel food coloring until desired shade is reached.
4. Scoop dough into tablespoon-sized mounds, chill for 2 hours or overnight.
5. Preheat oven to 350°F. Roll dough balls in sprinkles or sugar, then bake for 9–11 minutes.
6. Cool cookies 5 minutes, press a chocolate kiss into each, and freeze for 10 minutes. Cool completely before serving.
Notes
Chill the dough to prevent cookies from spreading. Use parchment paper for even baking. Press kisses gently to avoid cracking.
- Prep Time: 20 minutes
- Cook Time: 10 minutes
- Category: Halloween, Cookies, Dessert
- Method: Baking
- Cuisine: American
Nutrition
- Serving Size: 1 cookie
- Calories: 140
- Sugar: 11g
- Sodium: 85mg
- Fat: 7g
- Saturated Fat: 3g
- Unsaturated Fat: 3g
- Trans Fat: 0g
- Carbohydrates: 17g
- Fiber: 1g
- Protein: 2g
- Cholesterol: 15mg