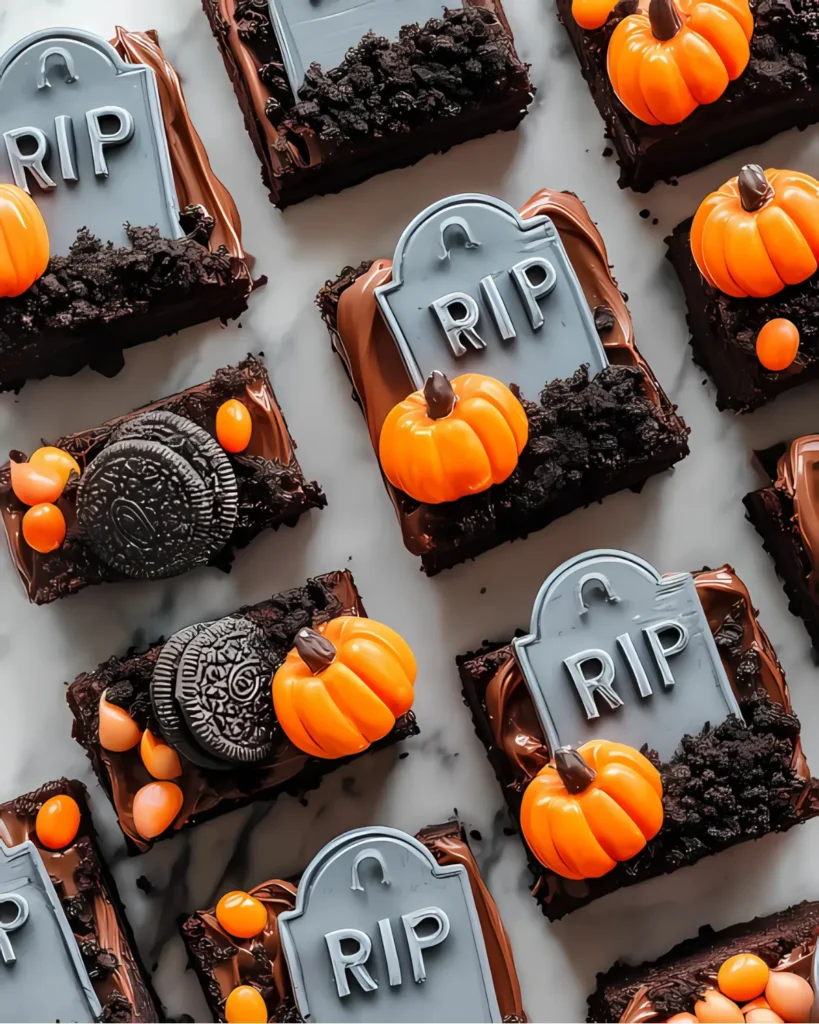
If you’re searching for the ultimate Halloween dessert that combines rich chocolatey indulgence with playful spooky fun, these Graveyard Brownies Cookie Tombstones are your go-to treat. With a fudgy brownie base, crushed chocolate “dirt,” and cookie tombstones decorated with eerie messages, this dessert is both festive and delicious. Whether you’re hosting a Halloween party or making something fun with the kids, this recipe is simple, creative, and incredibly crowd-pleasing. In this post, we’ll explore the inspiration behind the dish, a detailed step-by-step guide, decoration tips, and clever storage solutions to keep your graveyard looking fresh.
Spooky Inspiration for Graveyard Brownies Cookie Tombstones
A Chillingly Sweet Memory from My Kitchen
There’s just something magical about baking around Halloween. The cool air, the flicker of candlelight, and that creative itch to make something as spooky as it is sweet. The first time I made Graveyard Brownies Cookie Tombstones, I was trying to bring a little haunted charm to a fall bake sale. I’d just picked up a box of brownie mix and some leftover Milano cookies from another recipe, and the idea clicked: what if each brownie was a miniature grave?
So I baked a pan of rich, dense brownies, carved them into small graves, and added cookie tombstones with shaky, spooky writing using black icing. To give it texture, I crumbled chocolate sandwich cookies over the top—instantly transforming brownies into a graveyard scene. Add a candy pumpkin or two, and suddenly, I wasn’t just serving dessert—I was sharing a bite of Halloween magic.
Now, every fall, this is a tradition in our home. It’s one of those recipes where kids can help decorate, write their names on the tombstones, and laugh about the creepy shapes they create. Even better? It’s flexible—you can use store-bought brownie mix or your own homemade brownie batter if you’ve got the time. Either way, the joy is in the details.
If you’re already in the mood for Halloween baking, you’ll love these Halloween mummy cupcakes and spooky spiderweb chocolate cupcakes for extra haunted inspiration.
Whether you’re going for cute or creepy, these Graveyard Brownies Cookie Tombstones are as fun to make as they are to eat.

How to Make Graveyard Brownies Cookie Tombstones at Home
Simple Ingredients for Spooky Fun
To whip up a batch of Graveyard Brownies Cookie Tombstones, you only need a few staple ingredients and a bit of Halloween spirit. This recipe uses a boxed brownie mix to keep things easy, but you can swap in your favorite homemade version if you prefer.
You’ll Need:
For the Brownies:
- 1 box of chocolate brownie mix
- Eggs, vegetable oil, and water (follow the package instructions)
For the Graveyard Decorations:
- 12 rectangular cookies (like Milano cookies for tombstones)
- Black gel or chocolate writing icing
- 50 g crushed chocolate sandwich cookies
- 12 candy pumpkins for that Halloween touch
These ingredients transform a classic dessert into something delightfully spooky. Try pairing them with Halloween Pretzel Rods or Pumpkin Cupcakes for a full haunted dessert spread.
Step-by-Step: Build Your Brownie Graveyard
- Bake the base
Start by preparing the brownie batter according to the box instructions. Pour it into a greased 9×13-inch pan and bake. Let the brownies cool completely before decorating—this ensures they hold their shape. - Slice into grave plots
Cut the cooled brownies into 12 equal squares. These will be the base of your Graveyard Brownies Cookie Tombstones. - Design your tombstones
Using black gel icing, write spooky messages on each rectangular cookie: “RIP,” “Boo,” or silly names like “Ghoulia.” Let the icing set. - Decorate your graveyard
Press a cookie tombstone into each brownie. Sprinkle crushed chocolate sandwich cookies around the base to mimic grave dirt. - Add Halloween flair
Top each square with a candy pumpkin to complete your Graveyard Brownies Cookie Tombstones.
With every bite, you’ll taste chocolatey richness, crunchy cookie “dirt,” and festive Halloween charm. These Graveyard Brownies Cookie Tombstones are a must for any spooky celebration.
Decorating Graveyard Brownies Cookie Tombstones Like a Pro
Spine-Chilling Ideas to Elevate Your Graveyard Brownies
Once your brownies are baked and cut, the real Halloween fun begins—decorating! One of the most exciting things about Graveyard Brownies Cookie Tombstones is how creative you can get with the spooky details. Whether you’re going for silly-scary or authentically eerie, there’s no wrong way to design your edible cemetery.
Use black gel icing to write different tombstone messages like “Here Lies My Diet” or “Zzzombie.” You can also vary the cookies—use rectangular shortbread or even chocolate-covered graham crackers for a different look. Want to go further? Add candy bones, gummy worms slithering out of the “dirt,” or crushed chocolate cookies mounded for fresh graves.
For an extra festive twist, drizzle red icing for a “bloody” touch or sprinkle edible glitter for a haunting glow. If you love Halloween baking, these ghost cupcakes and gravedigger chocolate cakes are great companions to your tombstone brownies on the dessert table.
The decorations on your Graveyard Brownies Cookie Tombstones are what transform them from simple brownies into show-stopping Halloween desserts that will wow kids and adults alike.
Serving Tips for Halloween Gatherings
When serving at a party, arrange your Graveyard Brownies Cookie Tombstones on a large platter sprinkled with extra cookie crumbs for a graveyard “ground.” Use a few plastic spiders or mini skeletons for atmosphere. If serving outdoors, keep them in a covered container to prevent melting or moisture on your tombstones.
Need to prepare ahead? No problem. You can bake and cool the brownies a day in advance. Store the undecorated brownies in an airtight container, and decorate the next day for peak freshness.
For single-serve portions, wrap each brownie in cellophane with Halloween ribbon—perfect for school treats or trick-or-treat handouts. Or, serve alongside pumpkin spice truffles for a dessert spread that screams fall flavor.
By adding your personal touch to these Graveyard Brownies Cookie Tombstones, you’ll have a centerpiece-worthy dessert that’s scary good.

How to Store and Prep Graveyard Brownies Cookie Tombstones Ahead
Keep Your Tombstones Standing Tall
After you’ve built and decorated your Graveyard Brownies Cookie Tombstones, the next challenge is making sure they stay fresh and upright until it’s time to serve. These treats aren’t just delicious—they’re a visual centerpiece. So, keeping the cookie tombstones intact and your brownie base soft is key.
To store your decorated brownies, place them in a single layer in an airtight container. If stacking is necessary, insert sheets of wax paper between layers, but be careful not to press down on the tombstones. Keep the container at room temperature if serving within 24 hours.
Want to make them last a bit longer? Refrigerate them in a sealed container for up to 4 days. Before serving, allow them to come to room temperature for best texture and flavor. The cookie tombstones may soften slightly over time, but they’ll still look fantastic—especially if you’ve added spooky spider pretzel mix or candy decor around the edges.
Make-Ahead Magic for Stress-Free Celebrations
Graveyard Brownies Cookie Tombstones are perfect for making ahead, especially if you’re planning a big Halloween party or potluck. You can bake the brownies 1–2 days before decorating. Store them uncut and undecorated in an airtight container. The night before your event, slice them, add your cookie tombstones, crushed “dirt,” and candy pumpkins for that fresh-made finish.
If you’re crafting multiple Halloween desserts like Halloween Funfetti Cupcakes or pumpkin spice bundt cake, staggering your baking and decorating time helps reduce stress.
Freezing is also an option—just freeze undecorated brownie squares. Thaw overnight in the fridge, then decorate on the day of serving. This way, your Graveyard Brownies Cookie Tombstones look fresh, festive, and party-ready without last-minute chaos.
Whether you’re prepping a week in advance or the night before, this spooky dessert adapts beautifully to your schedule.
Conclusion: The Perfect Halloween Brownie Treat
Graveyard Brownies Cookie Tombstones combine festive creativity with irresistible chocolate flavor—making them a must-bake for your Halloween lineup. Whether you’re hosting a costume party, packing lunchbox surprises, or simply enjoying an autumn weekend bake, these spooky brownies deliver fun and flavor in every bite.
Decorate them your way, get the whole family involved, and don’t be afraid to experiment with toppings. From candy pumpkins to crushed cookie dirt, every detail adds charm to your edible graveyard. These treats aren’t just visually fun—they’re a delicious tradition worth repeating every October.
Need more recipes? Follow me on Pinterest.
Print
Graveyard Brownies Cookie Tombstones – 5 Spooky Ideas
- Total Time: 40 mins
- Yield: 12 servings 1x
- Diet: Vegetarian
Description
These Graveyard Brownies Cookie Tombstones are spooky, chocolatey, and perfect for Halloween parties or kid-friendly baking projects.
Ingredients
1 box chocolate brownie mix
Eggs, vegetable oil, and water (as listed on box)
12 rectangular cookies (like Milano)
Black gel icing or chocolate writing icing
50 g crushed chocolate sandwich cookies
12 candy pumpkins
Instructions
1. Preheat oven and prepare brownie mix as per box instructions.
2. Bake in greased 9×13 pan. Let cool completely.
3. Cut into 12 squares once cooled.
4. Decorate cookies with spooky words using black icing.
5. Insert a decorated cookie into each brownie square.
6. Sprinkle crushed cookies in front of tombstone to look like dirt.
7. Top with one candy pumpkin per brownie for a festive touch.
Notes
Brownies can be made 1–2 days in advance.
Use shortbread or graham cookies as tombstone alternatives.
Store decorated brownies in airtight container up to 3 days.
- Prep Time: 15 mins
- Cook Time: 25 mins
- Category: Halloween Desserts
- Method: Baking
- Cuisine: American
Nutrition
- Serving Size: 1 brownie
- Calories: 210
- Sugar: 19g
- Sodium: 140mg
- Fat: 9g
- Saturated Fat: 3g
- Unsaturated Fat: 4g
- Trans Fat: 0g
- Carbohydrates: 32g
- Fiber: 1g
- Protein: 2g
- Cholesterol: 15mg

3 thoughts on “Graveyard Brownies Cookie Tombstones: 5 Ultimate Spooky Ideas”
Comments are closed.