Looking for a Halloween dessert that’s as fun to make as it is to eat? This Candy Corn Fudge recipe combines white chocolate, cake mix, and vibrant layers of orange, yellow, and white for a festive and nostalgic twist. It’s a perfect no-bake Halloween dessert that doubles as a party centerpiece or a delightful edible gift. Whether you’re prepping for a spooky bash or just craving a quick Halloween treat, this recipe checks every box: easy, colorful, creamy, and irresistibly sweet. Let’s dive into Part 1 and celebrate the story behind this magical fudge.
A Sweet Story Behind Candy Corn Fudge
Candy Corn Fudge: The Ultimate Halloween Party Dessert
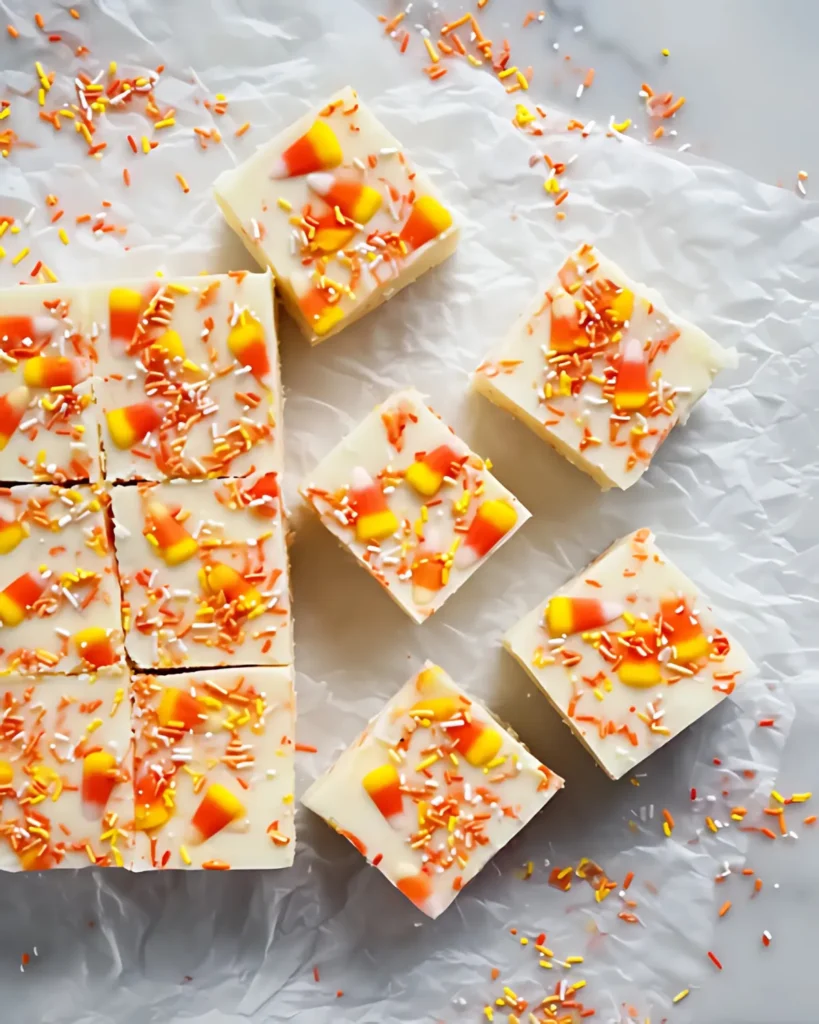
Candy Corn Fudge is more than just a colorful sweet treat—it’s a festive favorite that brings instant nostalgia and big flavor to your Halloween dessert table. With bold layers of yellow, orange, and white, it mimics the iconic fall candy we all grew up with, but transforms it into a creamy, cake batter-inspired fudge that even candy corn skeptics can’t resist.
If you’re planning a spooky party, this easy fudge deserves a spot right next to crowd-pleasers like Halloween Rice Krispie Treats. Whether you’re prepping goodies for school, friends, or a neighborhood bash, Candy Corn Fudge delivers big-time on wow factor and flavor—with minimal effort.
Inspired by Childhood Magic
Hi, I’m Ethan—the cook and creator behind this cozy kitchen space. When I was a kid, Halloween was more than costumes and candy—it was a full-on celebration in our house. I still remember the smell of white chocolate melting in the kitchen, the joy of vibrant food coloring staining our fingers, and the sugary anticipation of treats cooling in the fridge. That’s when my grandmother first made a layered fudge that looked just like candy corn.
That simple, sweet memory inspired this Candy Corn Fudge recipe. It brings together the charm of seasonal colors with the smooth richness of white chocolate and the nostalgic taste of birthday cake. No candy thermometer, no baking—just melt, color, pour, and chill.
It’s now a yearly tradition in my home. And if you’re the kind of cook who likes recipes that feel special but aren’t fussy, this one’s for you. It’s especially fun to make with kids, who love seeing the layers come together like magic.
Why You’ll Fall for This Fudge
There are plenty of Halloween recipes out there, but Candy Corn Fudge checks all the right boxes: easy, delicious, and show-stopping. It’s a no-bake recipe, which means no oven needed, and it sets beautifully overnight in the fridge. You can even customize it with spooky sprinkles or add gummy candy for texture.
And because it’s made with pantry staples like white chocolate chips and sweetened condensed milk, it’s as practical as it is adorable. I love serving it alongside Spider Web Cheesecake or wrapping it in clear treat bags for neighbors.
In short? It’s the perfect Halloween party dessert—creamy, colorful, and unforgettable.
How to Layer Candy Corn Fudge Like a Pro

Step-by-Step Breakdown of the Candy Corn Look
Creating the signature tri-color look of Candy Corn Fudge isn’t just fun—it’s surprisingly easy. The key to success? Divide your ingredients evenly, work quickly, and chill between layers. Each section of fudge uses white chocolate chips, sweetened condensed milk, butter, and heat-treated cake mix—but the magic happens when the color comes in.
Start by prepping your 8×8 pan. Line it with parchment paper and leave overhangs on each side. Trust me, you’ll thank yourself later when it’s time to lift the chilled fudge out for slicing.
For the yellow layer, melt one-third of the white chocolate chips, condensed milk, and butter over low heat. Once melted, stir in the cake mix and a few drops of yellow food coloring. Pour it right into the center of your pan and let it settle. It will self-level naturally, giving you a perfectly smooth base.
Once that firms up slightly, repeat the process for the orange layer, using orange food coloring instead. Carefully pour it over the yellow layer. Again, let it settle and cool slightly.
Finally, for the white layer, repeat the same melt-and-mix process—just skip the coloring. Pour it over the orange section, then top the entire pan with festive sprinkles in candy corn shades.
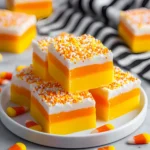
Refrigerate overnight for best results. When you’re ready to serve, lift the fudge out by the parchment, then cut into neat squares. Each piece will show those classic yellow, orange, and white stripes—the ultimate candy corn effect in fudge form.
Tips for Smooth, Vibrant Layers
To get those crisp, clean color separations, patience is key. Allow each layer to set slightly before pouring the next—don’t rush it. If the previous layer is too soft, the colors may blend. Too firm, and you risk separation. Around 10–15 minutes between pours usually does the trick.
Use gel food coloring instead of liquid for more vibrant color with less moisture. Liquid food dyes can thin the fudge mixture too much and affect how it sets. Also, keep the heat low while melting—white chocolate is delicate and can seize if overheated.
Another helpful trick? Pour each layer in the center and gently tilt the pan side to side instead of spreading with a spatula. This keeps the layers smooth and even without disturbing the ones below.
If you’ve mastered layered sweets like the Pumpkin Spice Fudge or other no-bake recipes, you’ll feel right at home crafting this Candy Corn Fudge. It’s all about rhythm, timing, and just a little bit of edible art.
With each creamy, colorful bite, this fudge brings festive cheer and homemade magic to your Halloween spread.
Why Candy Corn Fudge Works So Well

Flavor Meets Fun in Every Layer
There’s a reason Candy Corn Fudge has become a must-make Halloween dessert in so many homes. Beyond the stunning colors, it’s the flavor profile that really hooks people. Think birthday cake batter meets creamy white chocolate, all wrapped up in a no-bake fudge that melts in your mouth.
Each layer isn’t just about color—it’s about depth. The yellow and orange layers get their subtle cake flavor from heat-treated cake mix, giving the fudge a nostalgic, soft sweetness. The white layer, rich and creamy, balances it all out. It’s not too sweet, but just enough to feel indulgent.
Using condensed milk adds a silky texture that traditional candy corn lacks. Where candy corn can be grainy and overly sugary, this fudge is smooth, rich, and satisfying. That contrast is part of what makes it so appealing—even for people who usually avoid the actual candy.
Pairing this fudge with other seasonal favorites like Graveyard Chocolate Cake brings balance to your Halloween dessert table. Where cake delivers fluff and crunch, this fudge offers dense, creamy goodness in every bite.
Party-Ready, Kid-Friendly, Foolproof
One of the best things about Candy Corn Fudge is how easy it is to scale and serve. A single 8×8 pan makes 16 perfect squares—but you can double the recipe and use a 9×13 if you’re prepping for a larger crowd. The clean lines and vibrant layers make every piece look professional, even if you’re not a pro baker.
And because it’s a no-bake dessert, there’s no worrying about ovens, timers, or overbaking. You melt, color, pour, and chill. That’s it. It’s a great recipe for getting kids involved, too—they’ll love stirring the colors and adding the final layer of Halloween sprinkles.
Serving this fudge at parties? Wrap individual squares in wax paper or pop them into clear treat bags tied with orange ribbon. They hold up well at room temperature, making them ideal for party platters or edible gifts. Want more variety? Add it to a Halloween dessert board alongside Halloween Oreo Bark or some spooky truffles.
You can also switch things up by adding small gummy candies into the orange layer or swapping in chocolate chips for a marbled look. The base recipe is sturdy, forgiving, and fun to customize—no candy thermometer required.
Whether you’re whipping it up for a party or just to satisfy a sweet tooth, Candy Corn Fudge hits that perfect trifecta of easy, delicious, and festive.
Storing, Serving & Creative Twists for Candy Corn Fudge

How to Store and Prep Ahead
One of the biggest advantages of making Candy Corn Fudge for Halloween is its convenience. Not only is it no-bake, but it also stores beautifully. Once chilled and cut, you can keep the fudge in an airtight container in the fridge for up to 10 days. If you’re planning for a party or need to get ahead of a busy holiday schedule, this recipe is your best friend.
Layering it in parchment between rows prevents sticking, and you can even freeze the fudge for longer storage. Just wrap individual squares in plastic wrap, place them in a freezer-safe container, and freeze for up to two months. Thaw in the fridge overnight before serving.
This make-ahead quality makes it ideal for Halloween gatherings where you’re managing multiple dishes. Want to turn it into a DIY party favor? Package individual fudge squares in small boxes or treat bags with candy corn stickers for a memorable take-home treat.
For a dessert platter, pair this fudge with contrasting textures like the chewy goodness of Pumpkin Spice Fudge or the crunch of Halloween Funfetti Cupcakes. Your guests will love the variety, and your spread will look professionally curated.
Remixing the Classic Candy Corn Fudge
While the traditional version of Candy Corn Fudge is iconic, there are tons of ways to make it your own. Here are a few creative ideas:
- Add a crunch: Mix crushed graham crackers or cookie crumbles into the white layer for added texture.
- Spooky flavor swaps: Try using pumpkin spice cake mix instead of white cake mix for a seasonal twist.
- Double chocolate: Add a thin chocolate ganache layer on top before chilling, or mix mini chocolate chips into the orange layer.
- Gummy or candy add-ins: For more Halloween flair, stir in chopped gummy candy or candy eyeballs just before pouring each layer.
And if you want a shortcut or kid-friendly variation, you can simplify it by making just two layers: orange and white, or yellow and white. The recipe is flexible and forgiving, so don’t be afraid to experiment.
Want something even more whimsical? Swap the sprinkles for edible glitter or drizzle with dark chocolate before chilling.
Whether you go classic or creative, Candy Corn Fudge is the kind of dessert that brings out the joy in seasonal baking. It’s visually striking, easy to assemble, and utterly delicious—a guaranteed hit on any Halloween dessert table.
FAQs About Candy Corn Fudge
Can I make Candy Corn Fudge without cake mix ?
Yes, you can! While cake mix adds a birthday cake-like flavor and smoother texture, you can skip it if needed. Replace it with powdered sugar for sweetness and consistency, though the flavor will be more focused on the white chocolate. Just ensure whatever substitute you use is dry and fine to maintain texture.
How do you cut Candy Corn Fudge cleanly ?
To get sharp, clean cuts, chill your fudge overnight until it’s fully set. Use a long, sharp knife and run it under hot water between each cut. Wipe the blade dry before slicing again. This helps prevent the layers from smearing and keeps each square picture-perfect.
Can I use white chocolate bars instead of chips ?
Yes, high-quality white chocolate bars work just as well. Chop the bars finely so they melt evenly. Just be sure you’re not using baking white chocolate with no cocoa butter—those types don’t melt the same way and can become grainy.
Is Candy Corn Fudge gluten-free ?
This recipe can be gluten-free if you use a gluten-free cake mix and confirm that your white chocolate chips and sprinkles are certified gluten-free. Always check ingredient labels to be sure. This makes it a great option for Halloween parties with dietary restrictions.
Sweet, Simple, and Spooktacular
When it comes to festive fall desserts, Candy Corn Fudge checks every box. It’s colorful, creamy, easy to make, and full of nostalgic charm. Whether you’re crafting Halloween party desserts, prepping treats for a school event, or just indulging in a little seasonal fun, this fudge brings joy in every bite.
From the soft birthday cake flavor to the cheerful candy corn layers, it’s a playful spin on a classic that both kids and adults will love. Add it to your treat rotation alongside favorites like Candy Corn Popcorn Mix or Halloween Oreo Bark, and you’ve got the makings of a party spread to remember.
So pull out the sprinkles, warm up the white chocolate, and let this no-bake wonder take center stage at your next Halloween celebration. With just a few simple steps, you’ll have a dessert that looks impressive, tastes amazing, and disappears in seconds.
Need more recipes? Follow me on Pinterest.
Candy Corn Fudge
- Total Time: 15 minutes (plus chilling)
- Yield: 16 squares 1x
Description
This vibrant, tri-layered Candy Corn Fudge is the ultimate Halloween treat. It’s a no-bake, creamy dessert bursting with nostalgic flavor and festive charm—perfect for parties or edible gifts.
Ingredients
- 3 cups white chocolate chips (divided into thirds)
- 1 can (14 oz) sweetened condensed milk (divided into thirds)
- 6 tablespoons unsalted butter (divided)
- 1 ½ cups white or yellow cake mix, heat-treated
- Yellow gel food coloring
- Orange gel food coloring
- Halloween-themed sprinkles
- Parchment paper for lining the pan
Instructions
- Line an 8×8-inch pan with parchment paper, leaving an overhang on all sides.
- For the yellow layer: In a saucepan over low heat, melt 1 cup white chocolate chips, ⅓ can sweetened condensed milk, and 2 tablespoons butter. Stir until smooth.
- Stir in ½ cup cake mix and a few drops of yellow food coloring. Pour into the prepared pan and spread evenly. Let it chill for 10–15 minutes.
- For the orange layer: Repeat the process with 1 cup chocolate chips, ⅓ can condensed milk, 2 tbsp butter, and ½ cup cake mix. Add orange food coloring. Gently pour over the yellow layer. Chill for another 10–15 minutes.
- For the white layer: Melt the remaining chocolate, condensed milk, and butter. Stir in the final ½ cup of cake mix without coloring. Pour over the orange layer.
- Top with festive Halloween sprinkles in candy corn colors.
- Refrigerate overnight or until fully set. Lift fudge out using parchment overhang, cut into squares, and serve.
Notes
Use gel food coloring for vibrant layers without altering texture. Let each layer cool slightly before adding the next to keep colors crisp. Great make-ahead treat—lasts up to 10 days in the fridge or 2 months frozen.
- Prep Time: 15 minutes
- Cook Time: 0 minutes
- Category: Dessert
- Method: No-Bake
- Cuisine: American
Nutrition
- Serving Size: 1 square
- Calories: 210
- Sugar: 22g
- Sodium: 50mg
- Fat: 11g
- Saturated Fat: 7g
- Unsaturated Fat: 3g
- Trans Fat: 0g
- Carbohydrates: 25g
- Fiber: 0g
- Protein: 2g
- Cholesterol: 15mg

3 thoughts on “Candy Corn Fudge – 3-Layer Easy Halloween Favorite”
Comments are closed.