Santa Cheese Board for Fun Holiday Entertaining
The Story Behind My Santa Cheese Board
Hi, I’m Ethan—the cook, creator, and voice behind this cozy corner of the web.
The first time I made a Santa Cheese Board, I stood in my small, sunlit kitchen experimenting with cheese slices and pepperoni while my family peeked over my shoulder. I wanted something playful yet simple. Instead of baking cookies, I shaped cheese into Santa’s face. Instantly, everyone gathered around the table.
Since then, the Santa Cheese Board has become a tradition in our home. During the holidays, it sits proudly next to classics like my Christmas appetizer ideas from and in the summer, we recreate it as part of our Christmas in July snacks for kids. Because it looks cheerful and tastes familiar, kids always reach for it first.
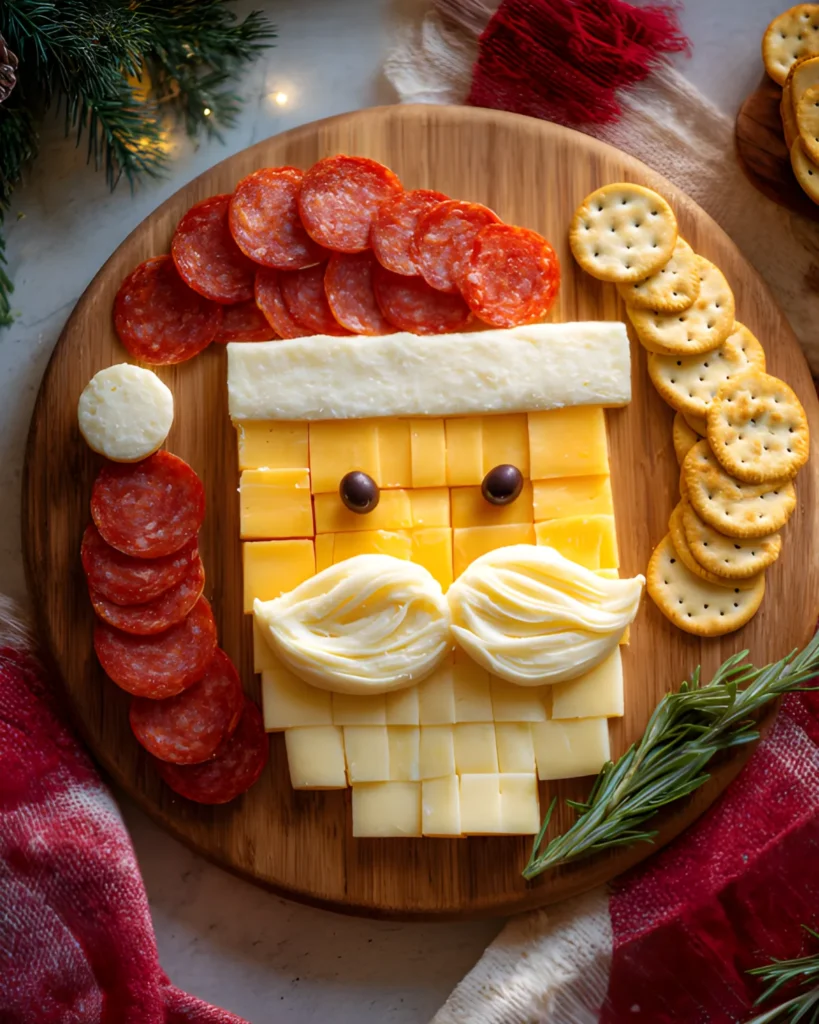
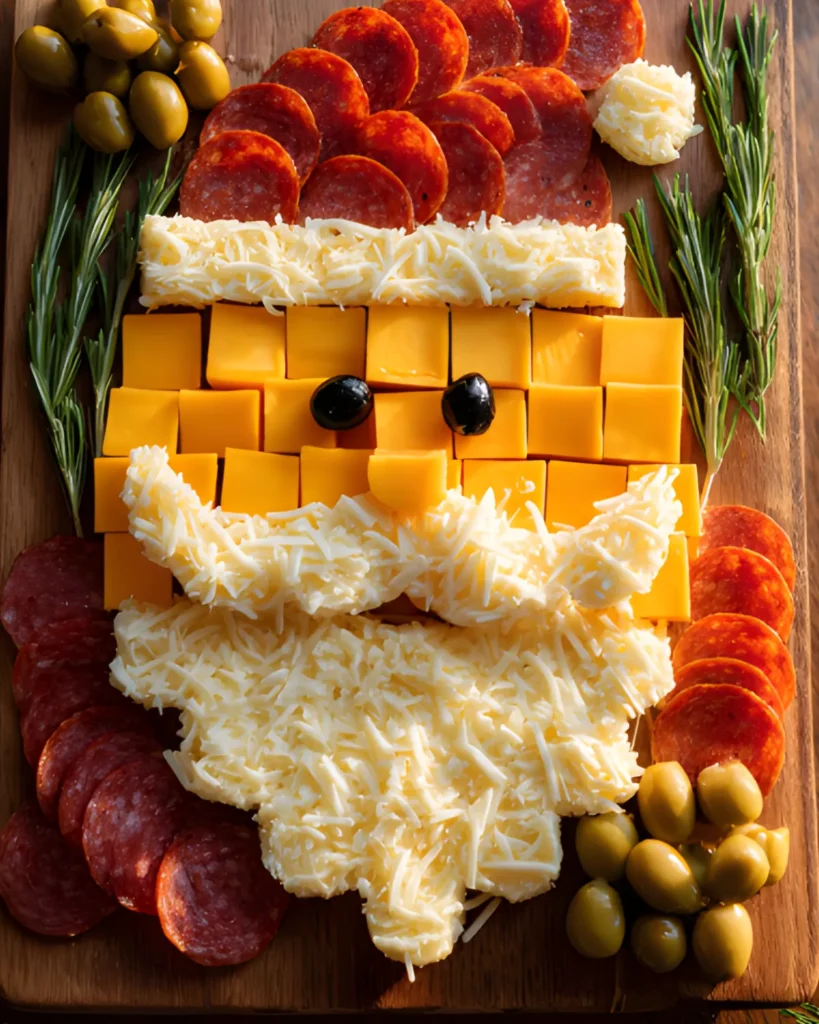
What I love most about this Santa Cheese Board is how easily it transforms a simple meat and cheese platter into something magical. With just yellow cheese, white cheddar, pepperoni, and olives, you create a centerpiece that sparks conversation. Moreover, you don’t need advanced skills. You just need creativity and a few minutes of assembly.
Whenever I host gatherings, I pair this board with simple party snack recipes like those you’ll find in the appetizer collection at . Together, they create a festive spread without stress. That’s the beauty of a Santa Cheese Board—it looks impressive, yet it stays wonderfully simple.
Why This Santa Cheese Board Is Perfect for Kids
Kids adore themed food. Therefore, when you serve a Santa Cheese Board, you instantly turn snack time into an experience. The familiar flavors feel comforting, while the playful design keeps them engaged.
Additionally, this Santa Cheese Board works beautifully for Christmas in July snacks for kids. Because summer gatherings often happen outdoors, you need food that stays manageable and easy to serve. Cheese cubes and pepperoni slices meet that need perfectly.
You can also adapt this design into a Santa Claus Fruit Tray or a Santa Claus Vegetable Tray. For example, swap cheese for strawberries and bananas, or use cauliflower and cherry tomatoes for a healthier twist. As a result, you create versatile summer Christmas food that fits every preference.
Most importantly, this Santa Cheese Board encourages participation. Let kids help shape the beard or place the olive eyes. Not only does that make prep fun, but it also builds excitement before the party even begins.
How to Build a Santa Cheese Board Step by Step
Ingredients Breakdown
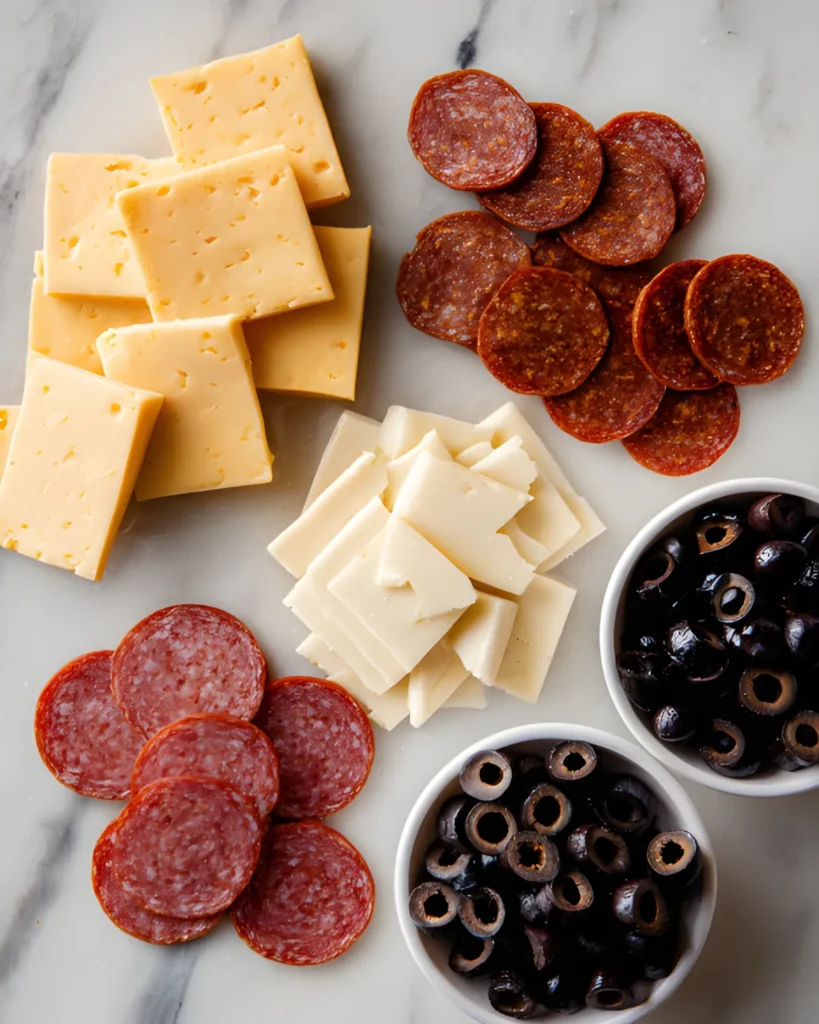
Before you begin assembling your Santa Cheese Board, gather all ingredients and prepare a large cutting board or serving tray. Because presentation matters, choose a flat surface that allows you to shape Santa’s face clearly.
Here’s a simple breakdown of what you’ll need:
| Ingredient | Purpose in Design |
|---|---|
| Colby Jack (yellow cheese) | Santa’s face base |
| White Cheddar (white cheese) | Hat trim, beard, mustache, eyebrows |
| Pepperoni slices | Hat, cheeks, nose, mouth |
| Black olive slices | Eyes |
If you prefer, you can substitute mild cheddar for Colby Jack. Similarly, mozzarella works well instead of white cheddar. Because this Santa Cheese Board focuses on shape, texture flexibility helps.
For more creative party snack inspiration, I often browse simple entertaining ideas like those in the holiday snack collection at, which pair beautifully with this board.
Step-by-Step Santa Cheese Board Assembly
Now let’s build your Santa Cheese Board step by step.
First, arrange four rows of yellow cheese squares to create Santa’s face base. Keep the edges aligned so the shape looks clean.
Next, add one row of white cheese above the yellow. Let it extend slightly beyond the edges. This becomes the fluffy base of Santa’s hat.
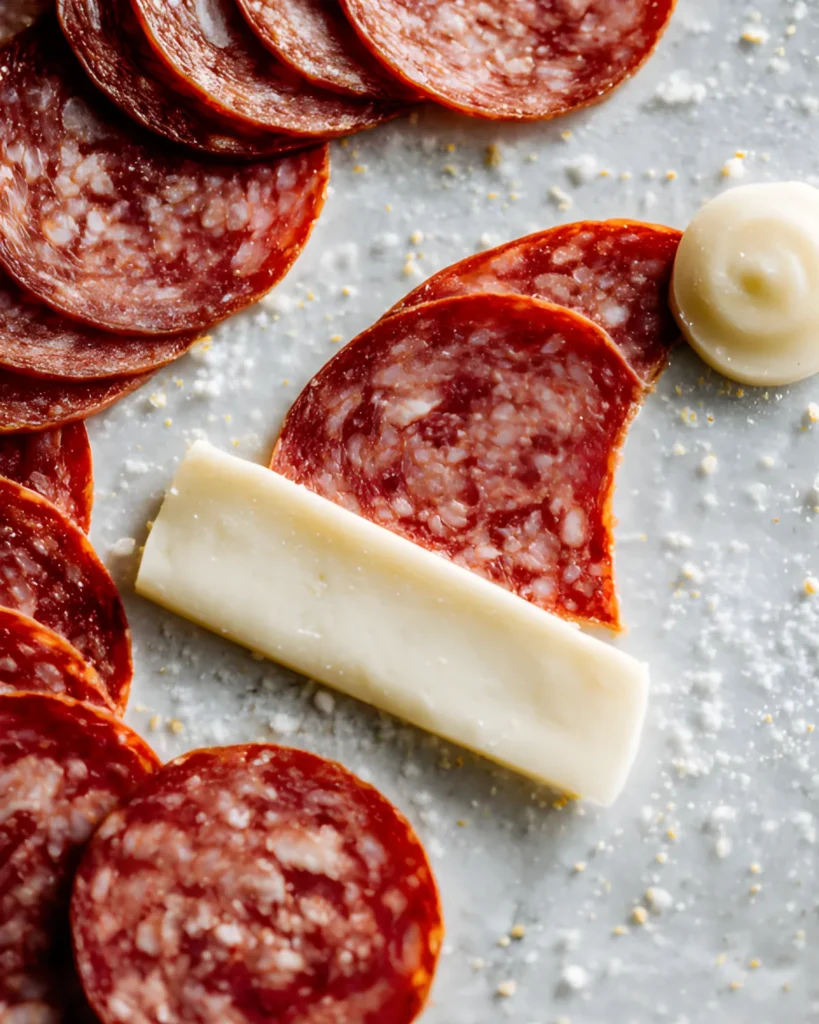
Then, layer pepperoni slices above the white row to form the curved top of the hat. Use three to four overlapping rows. Shape the top slightly rounded so it looks natural.
After that, insert a second row of white cheese between the first white layer and the pepperoni. Overlap slightly to create dimension.
Extend one single layer of pepperoni down one side of the face. This forms the hanging portion of the hat. At the bottom of that strip, place a small cluster of white cheese slices to create the fluffy pom-pom.
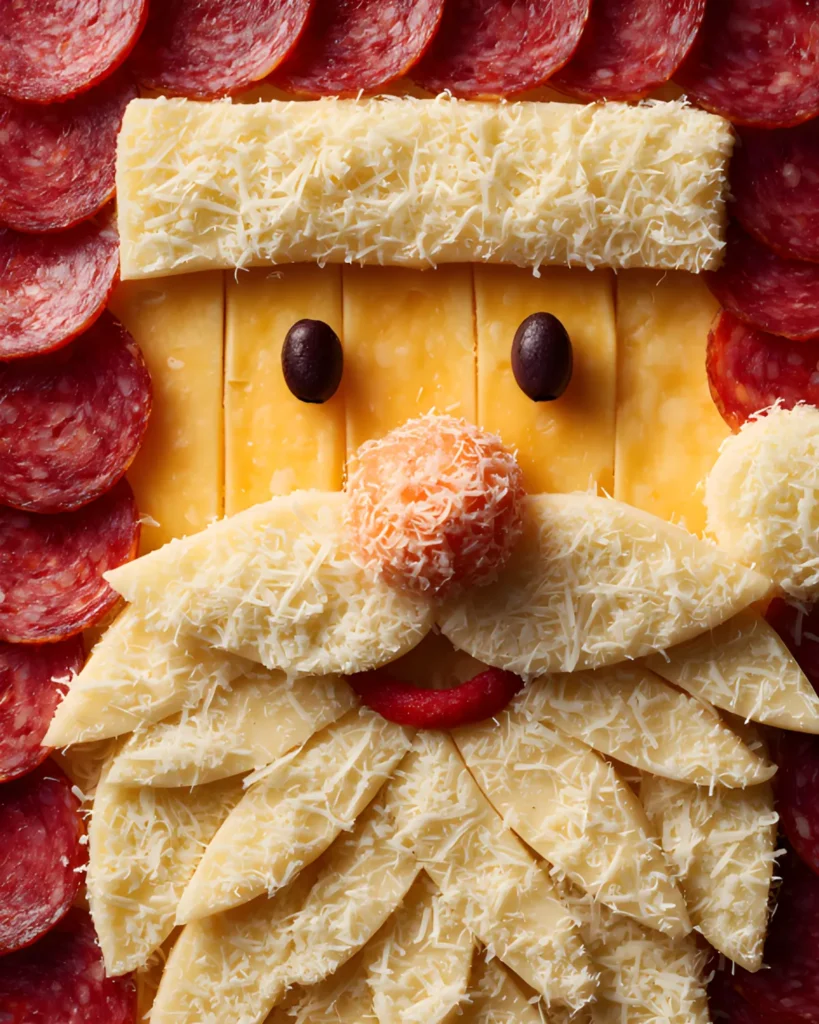
Now, build Santa’s beard. Add three curved rows of white cheese along the bottom of the yellow face.
Finally, shape the mustache and eyebrows using white cheese. Form cheeks, a nose, and a mouth using pepperoni. Add black olive slices for eyes. Adjust spacing carefully. Small tweaks make a big difference.
Once finished, surround your Santa Cheese Board with crackers for easy serving. If you want more crowd-friendly appetizer ideas, explore additional party-ready recipes at .
Creative Variations of a Santa Cheese Board
Turning It into a Santa Claus Fruit Tray
Although the classic Santa Cheese Board always wins hearts, you can easily transform it into a Santa Claus Fruit Tray for a lighter option. In fact, during warmer months, I often switch to fruit because it feels refreshing and fits perfectly into summer Christmas food themes.
Start by replacing the yellow cheese base with pineapple chunks or sliced bananas arranged tightly together. Then, use strawberries to form Santa’s red hat. Because strawberries naturally curve, they help you shape the top easily.
For the white hat trim and beard, use mini marshmallows, banana slices, or peeled apple slices. Additionally, shredded coconut creates a fluffy beard texture if you want extra dimension. For Santa’s nose, a single strawberry works beautifully. Meanwhile, blueberries or black grapes make perfect eyes.
This Santa Claus Fruit Tray works wonderfully for Christmas in July snacks for kids. Not only does it look playful, but it also encourages children to enjoy fresh fruit. Moreover, you can prepare most fruits ahead of time and assemble just before serving.
If you enjoy building creative boards like this, you might also love browsing fun family-friendly treats at which pair beautifully with fruit trays at summer gatherings.
Making a Santa Claus Vegetable Tray
On the other hand, if you want a savory and healthier twist, create a Santa Claus Vegetable Tray using the same layout as your Santa Cheese Board.
First, use sliced cucumbers or zucchini rounds to create the face base. Then, form the hat with cherry tomatoes layered tightly together. Because tomatoes hold their shape well, they create a bold red hat that stands out on the tray.
For the beard and hat trim, arrange cauliflower florets in curved rows. They naturally create a fluffy texture without extra effort. Add red bell pepper slices for cheeks and nose. Finally, use black olive slices for the eyes to maintain that familiar Santa expression.
This variation fits perfectly into Christmas in July snacks for kids because it offers crunch and freshness. Additionally, serve ranch or hummus in small bowls nearby to encourage dipping.
If you want more balanced party spreads, check out simple appetizer combinations at , where you’ll find easy ideas to complement your Santa Cheese Board or vegetable tray.
Both variations keep the festive spirit alive. Whether you choose fruit, vegetables, or cheese, you maintain the same charming design while adapting flavors to your guests’ preferences.
Serving Tips, Storage & Party Ideas for Santa Cheese Board
How to Serve Your Santa Cheese Board
Once you finish assembling your Santa Cheese Board, presentation becomes the next priority. Because this board already looks festive, keep the surrounding setup simple and clean. Arrange buttery crackers, whole-grain crackers, or mini breadsticks around the edges of the tray. This not only frames Santa’s face but also makes serving easy.
If you want to elevate your Santa Cheese Board, add small bowls of honey mustard or a mild dip nearby. However, avoid placing dips directly on the board. Instead, keep them separate so the design stays intact.
For outdoor gatherings, especially when serving summer Christmas food, place the tray over a larger tray filled with ice packs underneath. That way, the cheese stays cool without disrupting the display. Additionally, shade the board from direct sunlight to prevent sweating or softening.
When hosting larger events, pair this board with other festive appetizers like easy finger foods from and refreshing drinks from . Together, they create a balanced party table that feels intentional and cheerful.
Because the Santa Cheese Board doubles as décor and food, place it in the center of your table. It instantly becomes a conversation starter and draws guests in.
Make-Ahead & Storage Tips
You can prepare most components of your Santa Cheese Board ahead of time. For example, slice cheese and portion pepperoni earlier in the day. Store them in airtight containers in the refrigerator until assembly.
However, assemble the full Santa Cheese Board no more than 2–3 hours before serving for best freshness. Cover it loosely with plastic wrap and refrigerate. Remove it about 20 minutes before serving so flavors soften slightly.
If you have leftovers, separate ingredients rather than storing the full design. Cheese stays fresh in an airtight container for up to 3–4 days. Pepperoni lasts even longer when sealed properly.
If you transport the board, assemble it directly on the serving tray and wrap tightly. Keep it chilled during travel using a cooler bag.
With these simple tips, your Santa Cheese Board stays fresh, festive, and stress-free—whether you serve it for Christmas, Christmas in July snacks for kids, or any cheerful summer gathering.
Frequently Asked Questions
How do you keep a Santa Cheese Board fresh before serving?
Store it covered in the refrigerator and remove it about 20 minutes before serving. Keep it away from direct heat or sunlight, especially during summer parties.
Can I make a Santa Cheese Board the night before?
You can prep ingredients ahead, but assemble the full Santa Cheese Board a few hours before serving for the best appearance and texture.
What crackers go best with a Santa Cheese Board?
Buttery round crackers, whole-grain crackers, or mild-flavored crispbread pair best because they complement the cheese without overpowering it.
How do you make a Santa Claus Fruit Tray version?
Replace cheese with pineapple or banana slices for the face, strawberries for the hat, and marshmallows or banana slices for the beard. Use blueberries for the eyes.
Conclusion
The Santa Cheese Board brings creativity, flavor, and fun to any gathering. Whether you serve it during the holidays or create it as part of your summer Christmas food tradition, it always delivers smiles. Moreover, you can easily adapt it into a Santa Claus Fruit Tray or Santa Claus Vegetable Tray to suit your guests.
Hi, I’m Ethan—the cook, creator, and voice behind this cozy corner of the web. My love for food started in a small sunlit kitchen where simple ingredients became lasting memories. On this blog, I share comfort classics, creative twists, and easy recipes anyone can master. Cooking should feel joyful, not complicated. So pull up a chair, gather your ingredients, and let’s create something festive together.
Santa Cheese Board: Ultimate 5-Step Festive Party Favorite
Description
A festive Santa Cheese Board made with yellow cheese, white cheddar, pepperoni, and olives. Perfect for Christmas parties or Christmas in July snacks for kids.
Ingredients
1 10 oz Colby Jack cheese squares
1 10 oz White Cheddar cheese squares
1 3 oz pepperoni slices
2 slices black olives
Crackers for serving
Instructions
1. Arrange four rows of yellow cheese to form Santa’s face.
2. Add a row of white cheese above for the hat base.
3. Layer pepperoni in curved rows to form the hat.
4. Add second white cheese layer between hat base and pepperoni.
5. Extend pepperoni down one side for hanging hat.
6. Add white cheese at bottom for pom-pom.
7. Create beard with curved rows of white cheese.
8. Shape mustache, eyebrows, cheeks, nose, and mouth.
9. Add olive slices for eyes.
10. Serve with crackers.
Notes
Assemble 2–3 hours before serving for best freshness.
Keep chilled until ready to serve.
Customize with fruit or vegetables for variations.